Showing posts with label heirlooms. Show all posts

Monday, July 16, 2012

In The Red

Last June I was in the black. Most of my tomato plants got blight very early in the season and went black. It was really bad so I pulled them, tossed 'em, and craved tomatoes the rest of the summer. The other tomato plants went black (actually brown) in September.

This summer I'm in the red! My heirloom tomatoes are in full production, particularly these German Johnson beefsteaks.

German Johnson tomatoes harvested this evening. The largest tomato weighs 22 ounces.

There are at least 15 more impressively large tomatoes hanging on my German Johnson vine in varying stages of growth and ripeness. I also have two Hillbilly vines in heavy bloom, three Black from Tulas started in May, a Bush Beefsteak, and one Sungold hybrid tomato in the ground.

If I could only plant one variety it would definitely be Black from Tula. But German Johnson is a close second. And I'm not complaining after a 13-month tomato drought in my garden.

What's everybody growing out there? What are your favorite varieties of heirloom tomatoes? E-mail me some pictures (vaplantman@yahoo.com) and I'll post the best looking tomato of the bunch.

Saturday, December 3, 2011

Frost Protection

We had our first frosts of the year in late November. Two or three of them. Fortunately all the fall/winter veggies survived, but I'm making preparations to protect the crops once the temps remain consistently cold.

Last year I constructed two experimental mini hoop houses in mid January after the frost had already taken a nasty toll on the greens. This year I expanded the idea by building one long, continuous hoop house.

PVC hoop house frame built over raised beds of lettuce, spinach, chard, and other tender greens. Plastic will be attached soon.
Currently only the PVC has been added to the raised beds. I used 10-foot sections of 1/2" PVC pipe and pushed it directly into the soil within the raised beds. I bent each pipe by hand over the bed, forming the "ribs". I then attached the "ribs" to a long "spine" with plastic zip-ties. The structure is fairly strong and will withstand wind and snow. We are expecting warmer weather for the next 5 days so I likely won't secure the plastic covering until sometime next week.

Note how the PVC is pushed into the soil against the interior sides of the raised beds. No screws, brackets, or fasteners are required. It's an easy, effective, and inexpensive setup.
I only opted to cover my more tender vegetables like lettuce, arugula, spinach, and chard.  I did not cover the kale and root crops like carrots and beets. They are, however, heavily mulched with a thick layer of wheat straw for protection. They withstood just about everything last year and I'm hoping they do the same this year.

From left to right: Buttercrunch, Winter Density, Parris Island Cos, and Rouge d'Hiver lettuce. Spinach is barely visible farther down the bed. This hoop house will function like a mini refrigerator once it is covered with plastic, protecting the vegetables and keeping them cold but not frozen.
Colorful head of Rouge d'Hiver lettuce.
Ruby Red Swiss chard. I planted these seeds on September 15, but they took a long time to germinate because of very hot temperatures in late September and early October.
Not everything in the garden looks great right now. I had a heck of a time battling  caterpillars on my broccoli and kale. Fortunately they only seemed interested in those two plantings and not the other veggies, but it didn't take long for them to completely defoliate this poor plant.

Kale that was completely devoured by caterpillars. Lots of carnage and not a lot of leftovers.
There are a handful of chemicals and products (organic ones too) to battle these beasts. I did buy a bag of powdered Bacillus thuringiensis (Bt), an organic bacteria that is effective on caterpillars, but I got lazy and never applied the stuff.

Now I just need somebody to play Taps on the trumpet while I add these remains to the compost pile and pay my respects.

Friday, September 30, 2011

Late September

Late September at .09 Acres is a transitional period in the garden. The fig trees are lush and still loaded with a secondary crop of figs, reminiscent of mid-summer flavors. The slightly cooler weather, ripening pomegranates, and newly planted lettuce and spinach seedlings welcome the arrival of fall.

I put together this photo-mosaic on September 29 to give you an idea of what's taking shape in the yard. Please disregard the sunbathing hairless terrier lounging between the raised beds.

September at .09 Acres in Newport News, Virginia.
If you compare this picture with the main photo in the banner of my blog, you'll notice some pretty significant changes. The fig trees are quickly filling out against the south-facing fence (left). The espalier fig is reaching for the sky agains the shed (back left, near center). The raspberries and blackberries are looking a bit rough after the hot summer (back right). The peach tree has been replaced by 3 small rabbiteye blueberry bushes (right). I've found that peaches are nearly impossible to grow organically in this climate. And the pomegranate tree is flourishing (near right). I've also kept the grass and weeds in check with diligent digging, weeding, and mulching.

The raised vegetable beds look nearly naked, with the exception of a few emerging seedlings. You can see beet and carrot seedlings mid left and lettuce planted at staggered intervals near right. Within 30-45 days I'll be harvesting lettuce, spinach, radishes, and chard. I also plan on covering most beds with hoop houses to extend the growing season. They will also act like outdoor refrigerators keeping plants growing slowly but well preserved even during periods of frost and snow.

Monday, September 19, 2011

Heritage Harvest Festival

Last Saturday, the family and I attended the 5th Annual Heritage Harvest Festival at Thomas Jefferson's Monticello in Charlottesville, Virginia.

Image courtesy of the Heritage Harvest Festival. Jefferson's Monticello is on the top left of the image, and his terraced vegetable garden and orchard is located along the right side of the image.
Jefferson was a pioneer of and ultimate advocate for sustainable agriculture, and this made Monticello the perfect location for this great event. In short, the festival included everything from seed sales and heirloom tomato and watermelon tastings to hands-on workshops, presentations, and tours of Jefferson's amazing home, garden, and orchard. I highly recommend this event for anybody interested in all aspects of agriculture and simpler ways of living.

I could write pages and pages about the importance of everything presented at the event, but I figure most people who read this blog likely agree that a handful of seeds, the sweat of your brow, and dirt on your hands can lead to some pretty amazing things. Instead, here is a photo-journey of Thomas Jefferson's garden.

Southwest view of Jefferson's expansive vegetable garden. He located it on a south slope to maximize the sunlight, growing seasons, and air movement down the slope.
Peach and other fruit trees in Jefferson's orchard (center of image). Corn is visible in the left foreground, blooming rosemary on the right, and I'm not sure what's blooming in the center.
A staggered row of sea kale.
A lush bed of sweet potatoes.
Tree onions, also called top-set or walking onions, are very hardy perennial and multiplying top-setting onions. This means that they form new onion bulblets where most onions form flowers. They don't produce very large bulbs, but they are fun to grow and nearly impossible to kill. If you've never tried growing onions, start with these to boost your confidence.
Two rows of onions in between peppers and squash.
French artichokes and a nifty wooden plant label.  Each row of veggies, herbs, and flowers was clearly identified by these labels, which made it much easier to identify specific varieties of plants.
I had never seen sesame before, other than on my bagels, but Jefferson's garden was loaded with it.  Each one of these pods is filled with sesame seeds. I broke open one of the drier, yellow pods with my fingers and seeds spilled onto the ground. I can't think of any other museum or heritage site where you can touch AND break part of the display or exhibit without being arrested!
This West Indian Gherkin (cucumis anguria) caught my eye. This beast doesn't look safe or edible...probably why it remained untouched.
Faded sign on a weathered fence that surrounds Jefferson's old nursery. 
Mulched pathway that cuts through the nursery. In the background you can see the edge of the vineyard.
In the orchard. Jefferson loved peaches and fought the noble fight that we still know today as "growing peaches organically". He had about as much success as we do today... 
Aerial view of Monticello not taken by me. I don't have a helicopter or a proper photo credit.
If you are interested in specific information about Jefferson's agricultural successes and failures at Monticello, you should read Thomas Jefferson's Garden Book. It's a compilation of his horticultural diaries, letters, and sketches. Probably more info than you ever wanted to know about the principal author of the Declaration of Independence and third President of the United States. For example, you'll read in his own words about his love of sweat peas, his favorite veggie. Random, but true.

Did anybody else attend the Heritage Harvest Festival this past weekend? Have you ever been to Monticello? I look forward to hearing from you.

Thursday, June 9, 2011

Early June

I'm back.  It's been almost 2 months since my last post.  Too long. Figured I'd do a big pictures post from the yard.  It's been an interesting and productive Spring, with a few setbacks as well. Generally speaking the garden is doing great.  Let's start with the good then I'll move on to the bad and ugly.  I successfully saved seed from my Vates kale and two varieties of Swiss chard.  They get tall when they bloom.  I'm talking 6-feet tall!  I added about 4" of fresh compost to each bed and built a small extension designated for herbs. Cucumber production has been nothing short of amazing.  I've got 5 Burpless plants in the ground and I'm pulling about 8 cukes/day.  I planted borage as a companion plant to my tomatoes, and it  is growing very well.  Beautiful flowers and they are edible too.  Peaches are hanging from the tree, the pomegranate is still in bloom. Raspberries were a tasty treat for about 3 weeks and are slowing now, but the blackberries are starting to kick in.  Figs have also put on new growth and, more importantly, many figs.  Not as many as I hoped for, but I pruned them back in early spring to encourage more branching for larger future harvests.  The fig espalier is developing fairly well.  I also just finished harvesting approximately 50 heads of Inchelium Red garlic and they are drying in my shed.  That's a short version of the good.

Now for the bad.  My precious, beloved, sacred, and coveted heirloom tomatoes are taking a beating.  They grew well for the first 6 weeks after I transplanted them into the garden, and they grew large.  I'm talking appx. 4-5 feet tall.  Then I started noticing what I believe to be blight.   It first appeared on a few leaves, then a stem, a truss of tomatoes, an entire stalks.  I quickly pruned those areas, sterilized my pruners, and then moved to the next plant.  But it kept moving.  So this past weekend and evening I ripped out 5 of my 7 in-ground tomatoes.  2 German Johnson, 1 Black from Tula, 1 Bull's Heart, and 1 Marvel Striped. I don't know why it hit so hard.  I immediately tossed them in the garbage bin.  I've been careful about watering, 2 doses of organic foliar feed (spaced 4 weeks apart) in the early morning, etc. etc., but I guess a large harvest like last year wasn't meant to be.  I'm planning on purchasing a few more plants and probably dropping in a few seeds as well, but I'm flat out bummed.

And the ugly.  Despite my best attempt at smothering the grass, it's back.  And lots of it.  Multiple layers of cardboard, 4-5 inches of mulch, periodic hand weeding of the errant shoot of grass, all for nothing.

Alright, enough gibberish!  Let's do the photos, shall we?
This is a mix of the good and the ugly.  Figs down the left, raised beds front and center, berries/peach/pomegranate on the right.  Oh yeah, and grass everywhere...son of a...
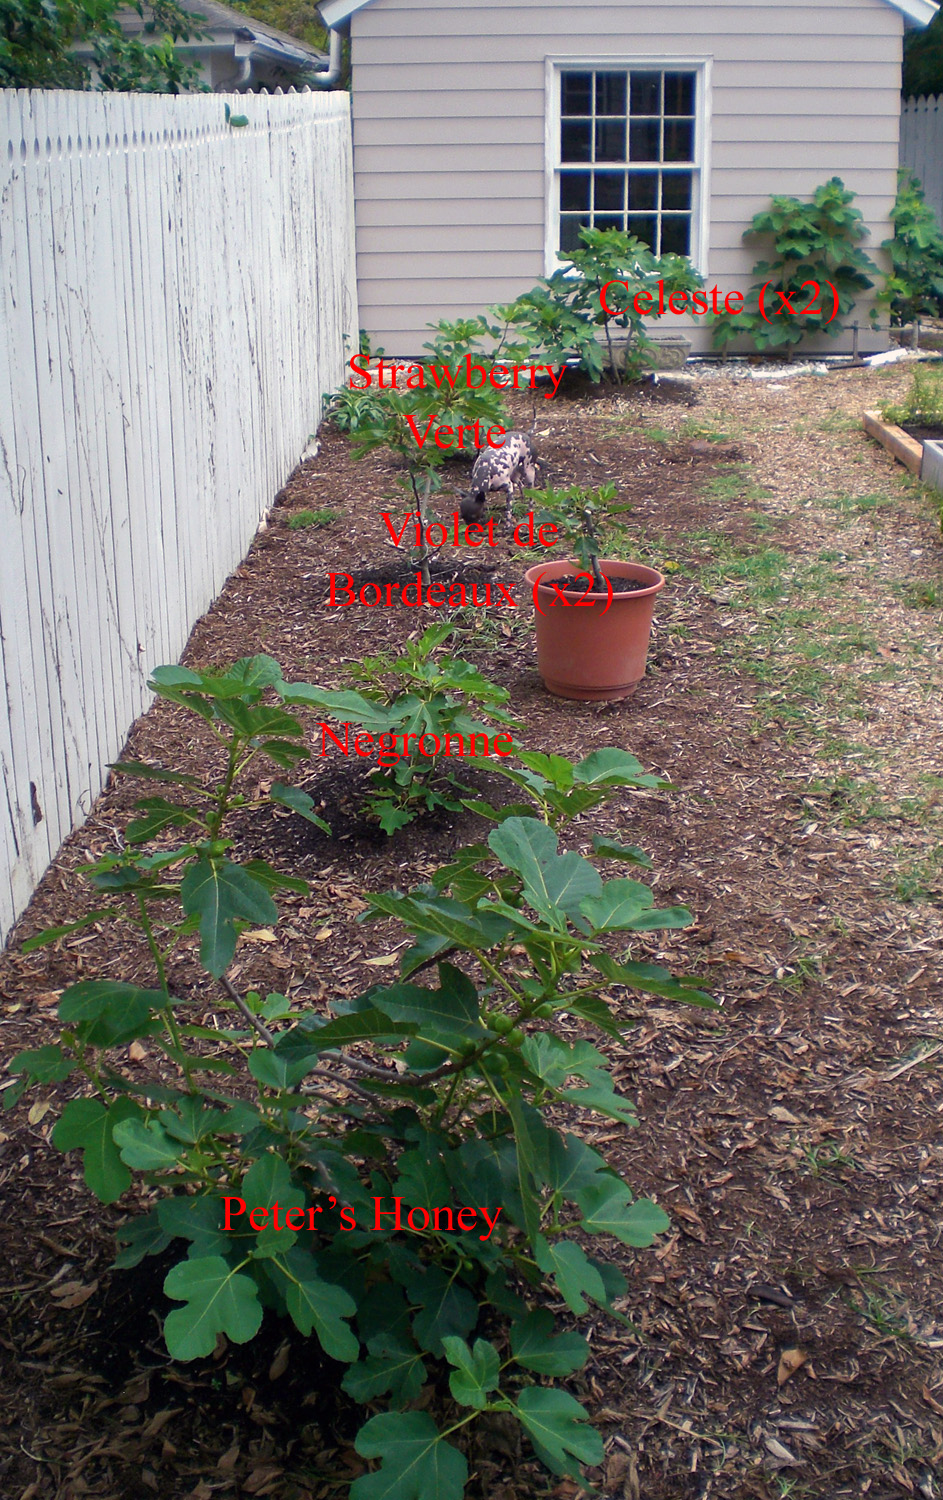
Row of figs down the left wall of the yard.  They are all fairly small, but are adapting well to their permanent location.  I grow a mix of brown, purple, and green figs.   If you look closely, you can spot Scout.  She's the hairless wonder dog.
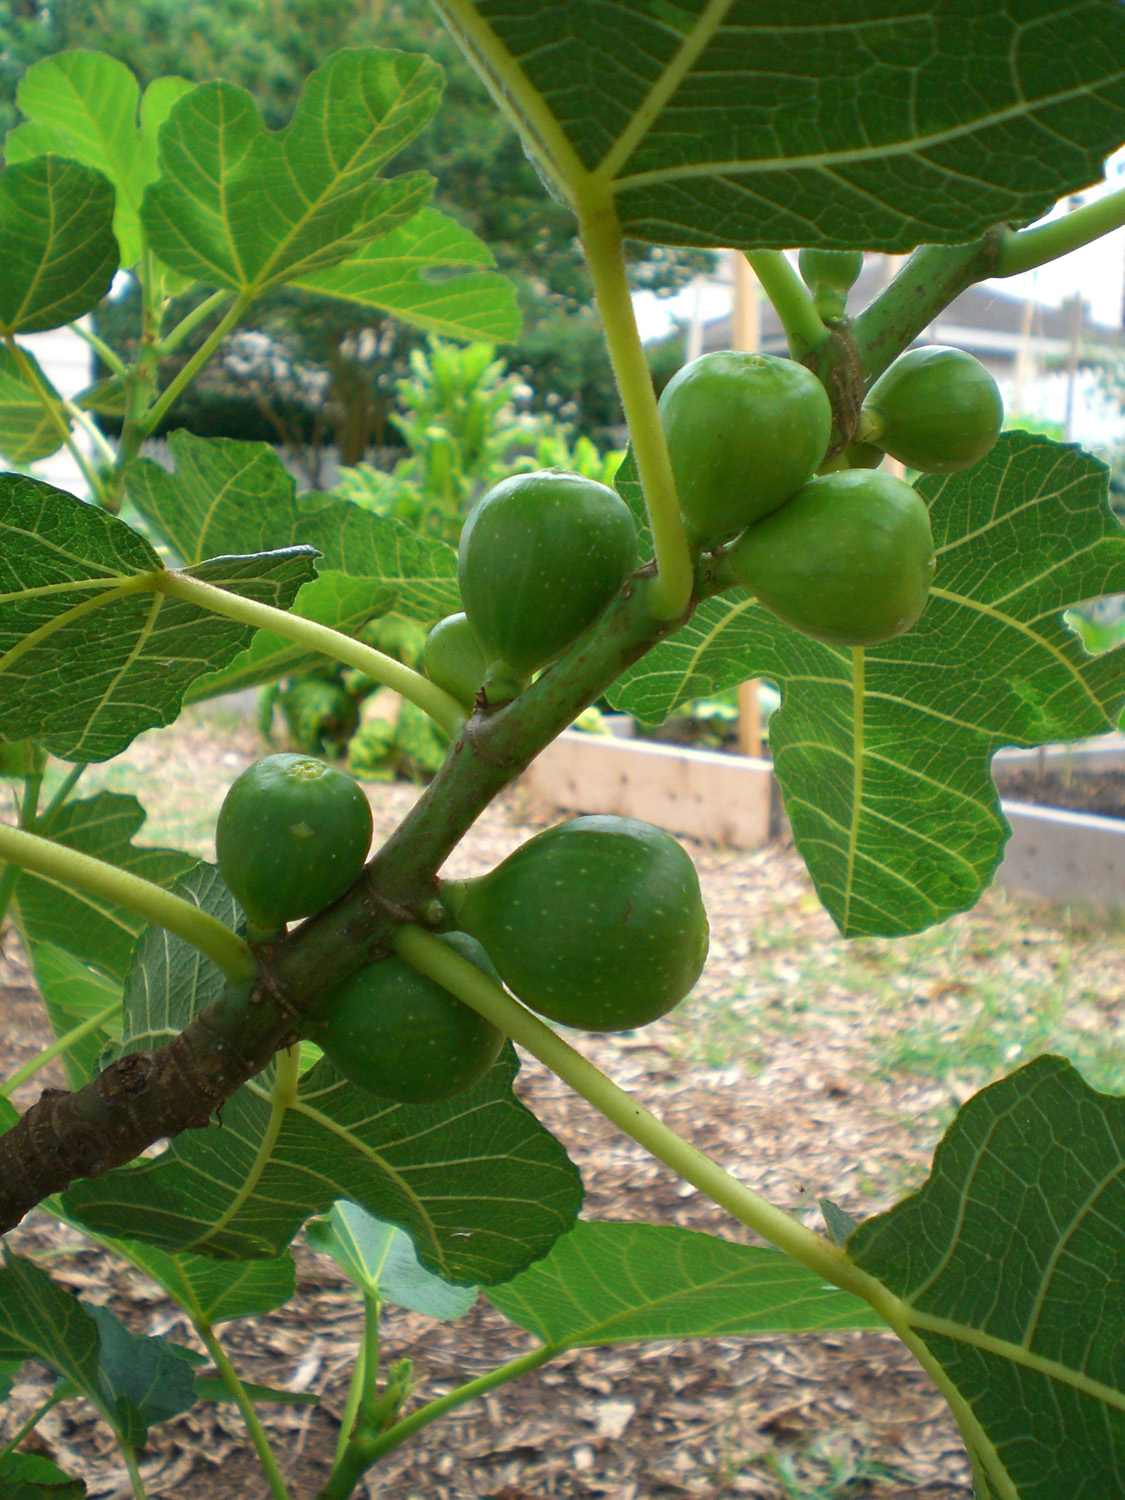
Peter's Honey fig.  In some areas this plant is putting out 2 figs per leaf, and I don't think that's very common. I'm not complaining.
Violet de Bordeaux figs.  I will pick individual ants off the tree to protect these, partly because I'm crazy but mostly because these things are heavenly.
The Red Haven peach tree is getting very large.  I pruned it heavily this winter and again about 3 weeks ago, and it keeps on growing.  I also thinned the fruits a while ago, but it's still hanging about 25 peaches.
Overhead view of the Red Haven peach tree showing the main scaffold limbs.  I'm trying to maintain an open center to allow light in and air to circulate.
I haven't sprayed this tree with a single thing this year and it still looks healthy.  I hope that holds up for the rest of the year.
The Russian Pomegranate also likes its sunny but sheltered location.  It's approximately 7' x 7' and was covered in blooms for 3 weeks.
A tiny pomegranate and a few blooms in the background.
This is a young Haku-Botan pomegranate tree, courtesy of Sybil Mays.  It will eventually produce yellow/gold pomegranates.  Sybil, this is the little plant you dug up from your side yard.  It has recovered and grown ALOT!
It's a cucumber jungle out there.  By now they've established very deep roots and don't show much wilting during the hottest (98 degrees) driest weather this year.
These beasts make a mean cucumber salad.
Ouachita blackberries beginning to ripen.  I'm not sure exactly what happened (or didn't happen), but I think poor or incomplete pollination led to irregularly shaped berries.  Look closely in the picture and you'll see what I'm talking about.
Almost ready.
All the literature says that borage flowers have a cucumber taste.  I disagree.  They taste like borage flowers.  Not really cucumbery, but just a general leafy green pleasant flavor.  I grew these as a companion plant for the tomatoes, but it clearly hasn't helped this season.  
Don't ask me how this partially ripened black cherry tomato tasted.  I wouldn't know.  My dog Diego ate it so you'll have to ask him.  
When most people draw a picture of the devil, they draw a red devil.  The devil is NOT red.  The devil is green.  Check out this mix of Bermuda grass and some other green beasts that are growing well despite Operation Smother.
Bermuda grass a-creepin'.  This is the aforementioned ugly.  I plan on pulling everything I can by hand rather than using some ineffective organic herbicide or crazy poisonous herbicide.  I do not want to mow this back yard ever again.  
I'll post again soon with pictures of the garlic harvest as well as the fig espalier.  How are things growing in your gardens?  If you are fortunate enough to have a bumper crop of heirloom tomatoes later in the summer, I'll likely be begging at your front door. That's a promise.

Monday, March 28, 2011

Seedlings and Cuttings

I got my seed starting operation off to a late start this spring.  It's now been a few weeks since I started them in trays over heat mats in my shed.  Here are a few pics:

Tomato seedlings with condensation inside the plastic domes.
Borage.  It's a good companion plant for tomatoes and has edible flowers.
A variety of very young pepper seedlings.
I know, I know, plastic is bad for the environment.  But I prefer using plastic trays and cells rather than peat because peat always dries out and gets crusty.  I just clean the plastic and re-use it each year.

I also started a TON of cuttings thanks to much assistance and information from Sybil and Rob.  I am attempting to root approximately 100 fig cuttings of the following varieties: Celeste, Blue Celeste, Hardy Chicago, Alma, Italian Golden Honey/Lattarula, Osborne Prolific, Magnolia/Brunswick, Strawberry Verte, Violet de Bordeaux, and Panache/Tiger.  I am rooting the cuttings in plastic cups (with drainage holes) filled with perlite and a pinch of potting soil.  Sybil recommended a mix of 50:50 perlite:vermiculite, but I was in a pinch for time and money and opted to use what I already had in my shed. Aside from some moisture management, there isn't much for me to do until they start to root in a bunch of weeks.

Assorted fig cuttings in cups of perlite.  I placed them in trays to make it easier to move them outside for watering.
If you look closely you can see some green growth emerging from the tips of the cuttings.  I'm less concerned with top growth and more concerned with root growth at this stage.
Sybil also presented me with cuttings of loquat (interesting evergreen edible) and che (relative of mulberry).  Although I've never eaten these fruits or attempted to grow them, it's a new opportunity to branch out of my comfort zone and try something new.  So I've got them in cups too.

Loquat cuttings with the leaves trimmed to reduce transpiration.
Che cuttings from a beautiful shrub/tree that looked similar in structure to a Japanese Maple.
I have no idea what I'm going to do with this many cuttings.  Even if I only achieve a 75% success rate with rooting I'm still going to be dealing with about 75 new plants.  Yikes!  Looks like I've got birthday and holiday gifts covered for a while, as well as a few extras for a plant sale.

Sunday, January 23, 2011

Read the Seed

Seed catalogs have been trickling in through the mail for the past few weeks.  Now it's time to read.  And plan.  Nothing beats planning for the upcoming year in the garden, particularly when it's cold and nasty outside.


I'm currently picking through Southern Exposure, Seeds of Change, Johnny's, and Edible Landscaping.  These aren't the only sources out there, but they are all good.  The first two primarily sell seeds.  Johnny's sells seeds and equipment, and Edible sells plants of various sizes.

I've been selecting heirlooms for the past few years and saving seeds from each harvest.  This has allowed me to build up a significant collection of various seeds that do well in hot and humid coastal Virginia.  They've become my go-to seeds.  Mostly tomatoes, peppers, cucumbers, lettuces, radishes, carrots.  But my eyes are always open for new crops to experiment with.

I'm considering buying a second pomegranate tree from Edible because the other one is doing so well in my yard.  I'm also looking at their offering of cascade hops (for home brewing).  Hops are perennials and grow quite tall.

What is everybody planning in 2011 for their gardens and yards?

Wednesday, December 1, 2010

Beets are Good Eats

Chioggia Beets.

Back in August I planted two short rows of Chioggia beets, an Italian heirloom that has a striped interior rather than the traditional beet red color.   I tried growing beets 2 years ago and only succeeded in growing greens with small roots, so this was my second attempt.  After some soil preparation I planted the seeds in 4-foot rows and kept them watered very well.  It wasn't very long before the seeds had germinated and I had greens reaching for the sun (and hopefully roots reaching for nutrients).  I kept a close eye on them and sure enough -- my plants actually looked like beets!


I decided to harvest them today because my taste buds ordered me to do it.  Based upon what I saw on top of the soil I figured I was in good shape.  But once I started harvesting them I noticed dozens of hairy roots all over the beets.  This was not what I was expecting.

Hairy Chioggia Beets.

I started to get sweaty and nervous as each beet I pulled yielded the same results.  Masses of hairy roots.  I decided to put my fear aside and harvest them all, let the taste of the beets do the talking.  After rinsing them, cutting and saving the greens for tomorrow, and slicing them open, I was quite pleased.  The interior revealed the classic swirl-like (some say bull's eye) pattern that makes the Chioggia so unique.

Quartered beets on a baking pan.

My wife also added some freshly picked carrots, garlic cloves, olive oil, oregano, thyme, toasted walnuts, and salt and roasted them in the oven.  She topped off her bowl with chevre, and I opted to keep mine plain.  Goat cheese is a bit too goaty for me.

The final product.

The roasted beets and carrots were good eats for sure.  I'd definitely consider it a successful crop this season.  But I'm still wondering why my beets didn't look like what I expected them to look like.  Guess that means I need to hit the books and read more about soil preparation, watering, etc.  But as I always say, the most valuable information comes from actually attempting to grow things in the first place.  You'll never know if you don't try.