Saturday, October 13, 2012

Gone to the Dogs

My raspberries have gone to the dogs. Literally.

Wednesday, August 29, 2012

Citrus Brown Rot

I was walking past my potted citrus trees, not really giving them more than a casual glance, when something unusual caught my eye. It was a big nasty brown area on a large but immature lemon.

Ugly looking lemon with a huge brown splotch.
I picked it off the tree and gave it a closer look. It actually had the appearance of a bulls-eye; brown concentric rings spreading from a circular center. I walked inside and fired up the Google while the bulls-eye stared back at me.

After a quick research session, I concluded that this lemon suffered (it's now deceased, I chucked it in the bin) from Citrus Brown Rot. According to the UC Pest Management Guidelines:

"Brown rot is caused by multiple species of Phytophthora when conditions are cool and wet. Brown rot develops mainly on fruit growing near the ground when Phytophthora spores from the soil are splashed onto the tree skirts during rainstorms; infections develop under continued wet conditions. Fruit in the early stage of the disease may go unnoticed at harvest and infect other fruit during storage."

Phytophthora is a tongue twister. It's also sort of like a fungi but also different. I won't get into the biological details. Not because I don't want to bore you, but because I don't understand most of it.

Guess where this lemon was growing? Yup, about four inches off the ground. We received over 10 inches of rain in the past five days and conditions have been generally wet and humid for two months. So basically perfect conditions for this stuff to thrive.

While I was fairly confident I correctly identified the ailment, I was more than disappointed that the person who named said ailment was less than creative. Citrus Brown Rot. Seriously? What about something like Brown Cyclops Syndrome or Ring of Suffering?

Citrus Brown Rot. It's a small price to pay for organic growing.

Sunday, August 5, 2012

Fig Porn

Yeah, that's right, I said it. Fig Porn!

For the true fig lover out there, nothing is hotter than pictures of ripe figs. In full confession, I actually borrowed the expression from a member of the Figs4Fun forum. Here are a few pics of my Violette de Bordeaux and Celeste figs from my garden this morning. Keep your shirt on...

Violette de Bordeaux figs ripening, but not yet ready for harvest.
Violette de Bordeaux and Celeste figs harvested on August 5, 2012.
Fig porn.
Even raunchier fig porn.

Fig porn on a Sunday?! I'm gonna burn for this one.

Saturday, August 4, 2012

Figs Are Ripening

This is what a ripe Celeste fig looks like.

Ripe Celeste fig hanging from a branch, waiting to be picked and eaten.
Notice how the fig has drooped, transitioned in color from green to dark brown, and the skin is visibly cracked. This fig also felt very heavy for its size. These are all good indicators that a fig is ripe.

My Celeste figs have been ripening since mid-July, and now my Violette de Bordeaux figs are starting to swell in size, change color, and droop a little bit. I will definitely be posting pictures of those as well for comparison.

Hope everybody else is enjoying mid-summer fruits from their own gardens.

Monday, July 16, 2012

In The Red

Last June I was in the black. Most of my tomato plants got blight very early in the season and went black. It was really bad so I pulled them, tossed 'em, and craved tomatoes the rest of the summer. The other tomato plants went black (actually brown) in September.

This summer I'm in the red! My heirloom tomatoes are in full production, particularly these German Johnson beefsteaks.

German Johnson tomatoes harvested this evening. The largest tomato weighs 22 ounces.

There are at least 15 more impressively large tomatoes hanging on my German Johnson vine in varying stages of growth and ripeness. I also have two Hillbilly vines in heavy bloom, three Black from Tulas started in May, a Bush Beefsteak, and one Sungold hybrid tomato in the ground.

If I could only plant one variety it would definitely be Black from Tula. But German Johnson is a close second. And I'm not complaining after a 13-month tomato drought in my garden.

What's everybody growing out there? What are your favorite varieties of heirloom tomatoes? E-mail me some pictures (vaplantman@yahoo.com) and I'll post the best looking tomato of the bunch.

Thursday, June 28, 2012

Ridiculous Radish!

Prior to this summer, I had never saved seeds from a radish. But after a successful and tasty radish growing season this spring, I decided to leave a few unharvested and let them go to seed. It didn't take long before the Blanche Transparente radishes I grew in a large ceramic pot sent their seed stalks skyward.

And I'll be honest, it seemed like a Jack and the Beanstalk experience. The radishes kept growing larger and fatter and the seed stalks kept growing higher and higher. Between March 28 and June 28 the radishes morphed into massive monsters. Have a look at these photos.

5-inch long Blanche Transparente radishes harvested on March 28, 2012.
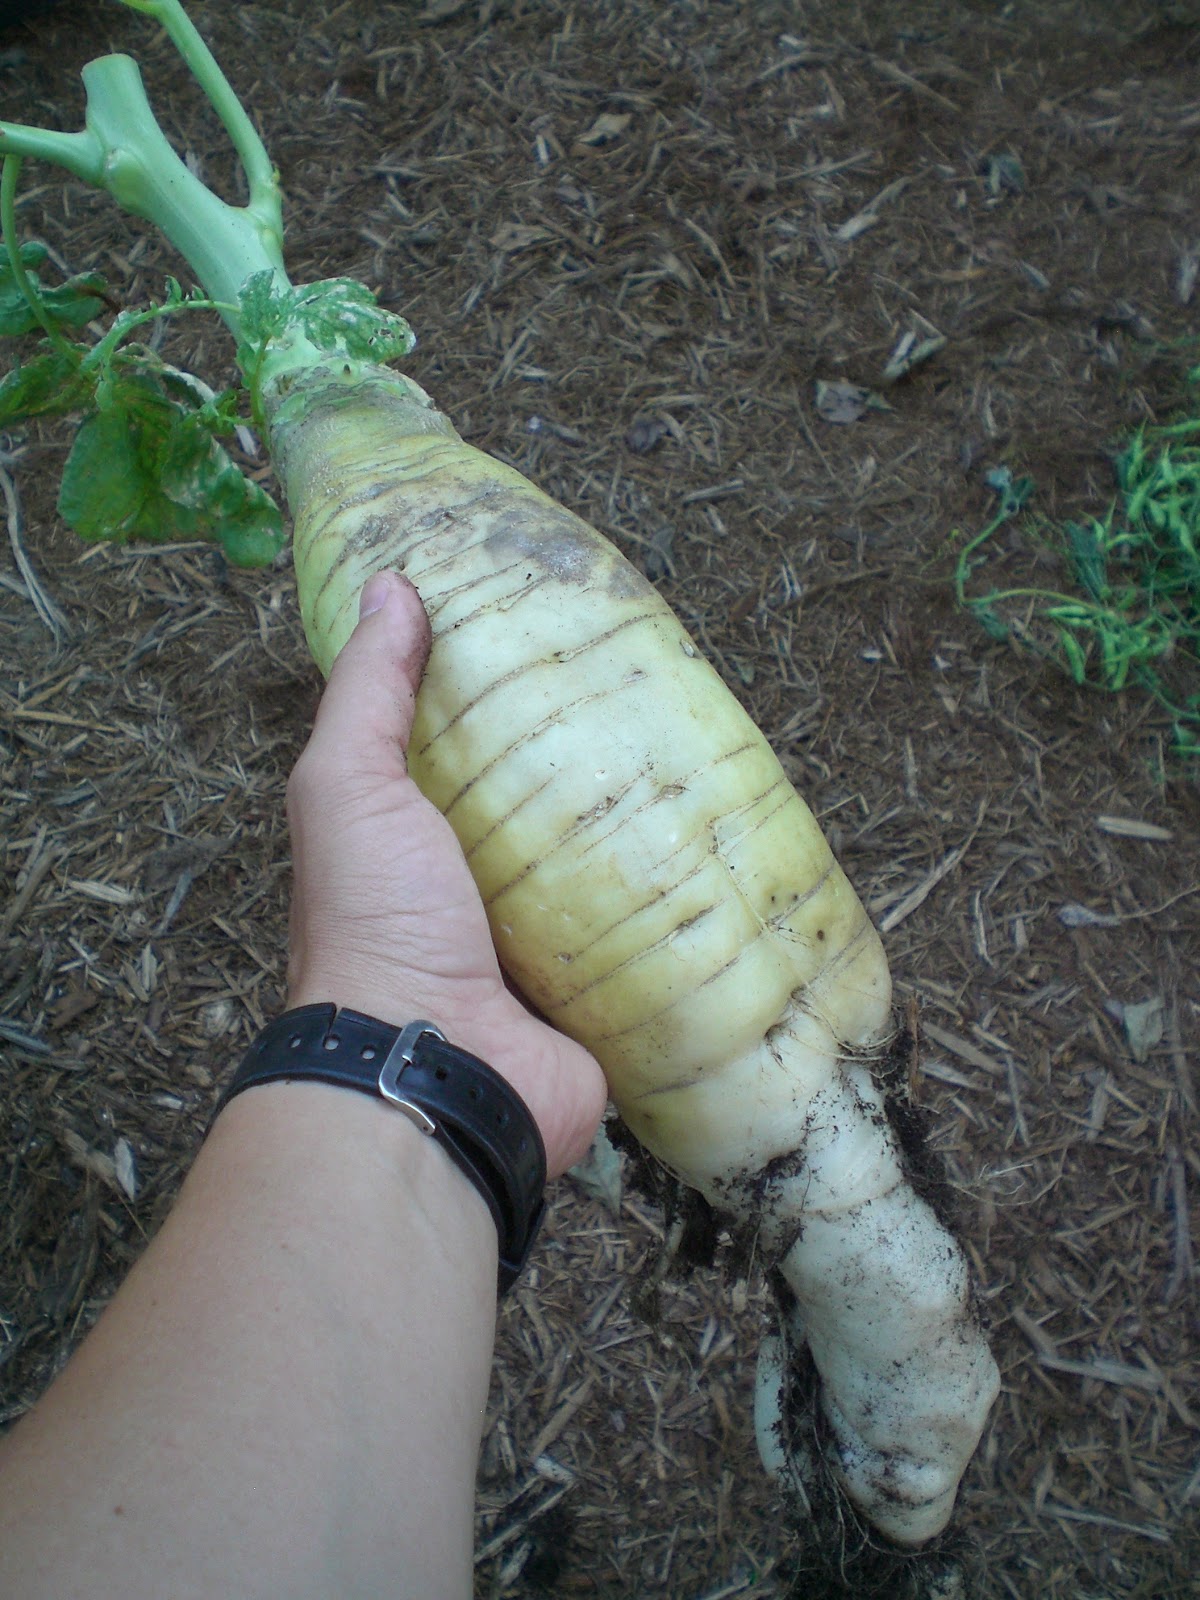
5-foot long Blanche Transparente radish and seed stalk pulled on June 28, 2012.

Yes, you read that correctly. This particular radish was over 5-feet long from root to seed pods. Here's a close-up of the root next to the pitchfork.

This radish root is longer than the business end of my pitchfork!

Last but not least, here's a photo of me holding the root. Despite its ridiculous, elephant-trunk-like shape, it was actually fairly light for its size.

Massive Blanche Transparente radish harvested from a ceramic pot.

I cut the seed stalks from each root and left the seed pods intact. They are now tied together and hanging from a rafter in my garden shed to dry out completely before I collect all the seeds.

Ridiculous radish indeed!

Wednesday, June 27, 2012

Espalier Fig IV

My most recent blog post about figs quickly generated lots of good comments. But one comment in particular stood out from the crowd. Check it:

"When I saw the headline I was SOOO excited that finally I was going to see what happened to the espalier you hacked off. What a tease... Please don't make us wait too much longer... Helen"

Well Helen, this post is for you.

On March 15, I did what some would consider a barbaric pruning job of my espalier fig. I sawed off all the vertical limbs just above the very bottom growth nodes. It was a job that even George Washington of great cherry tree chopping prowess would have to acknowledge with a tip of his hat.

Heavily pruned espalier fig on March 15, 2012

I'll admit at first I was a bit worried about the recovery of this fig tree. But at the same time, I was aware that fig trees are nearly impossible to kill. So basically I sawed, then sweated, then decided to sit back and let Mother Nature take it from there.

What does the espalier fig look like approximately 100 days after pruning? You wouldn't even know that I laid my hands on it.

Espalier fig on June 27, 2012. Most of the vertical limbs are nearly 7 feet tall. My dog Scout is in the picture to show you my fierce and formidable fig defender. I trained her so well to protect my fig trees from any number of different predators that she barely lets me near them without a promise from me to share the spoils.

The majority of the vertical limbs are now 7 feet tall, covered in lush foliage, and loaded with unripe figs. I'm also attempting to extend the right-most horizontal arm of the espalier. Last year I accidentally broke it off and it didn't re-grow. This spring, it shot out another arm and I quickly started to train it horizontally.

Slowly extending the length of the right-most vertical limb of my espalier fig near the shed door. I hope to train two vertical growths from this new extension over the next year or two.

Because I'm a bit clumsy, I also accidentally broke off two vertical growths early this spring. I'm still kicking myself about it because one never grew back and the other caused some lasting damage to the tree.

A sad reminder of what dragging a heavy garden hose can do to the tender new growth of a fig tree. Snapped it right off. Now it's just an ugly stump.
This growth was also damaged by a garden hose that I was trying to un-kink. The hose swung up in the air and snapped off the original growth that started in March. This skinny shoot that is now almost horizontal is a second growth. I'm waiting for it to harden off a bit before I train it vertically, otherwise it may break off again.

As a result of breaking off the growth in this second area, I exposed the fig tree's right horizontal limb to excessive direct sunlight due to lack of protective foliage. Believe it or not, a fig tree can get a pretty nasty sunburn and this is definitely the case with my tree. Have a look at the sun-damaged bark.

Sun damage on the right horizontal growth of my espalier fig. Hopefully it will recover. Some literature suggests that you can whitewash the exposed trunks of fig and other fruit trees to protect them from sun damage. Cue the SPF jokes...

Lastly, here are two pictures showing the new vertical growths. The first pic shows the base of a growth, and the second pic is take from above to provide a different perspective.

This year's growth directly above a pruned area. I stripped off two leaves to expose this area for the photo.
This is the same vertical growth depicted in the photo above. Note the figs growing above nearly every leaf. I can't wait for these babies to ripen, and neither can Scout (and every other bird, squirrel, ant, and creature in the yard).

So there you have it, Helen! A post about my espalier fig just for you. Hope you enjoyed it.

Thursday, June 14, 2012

They're Figgin' Huge!!

When healthy and planted in a good location, fig trees can grow unbelievably quickly and become very productive. Here is a photo of my fig trees 15 months ago after I transferred them from pots into the ground.

Fig trees down the left wall of .09 Acres in late March, 2011.
What do they look like today on June 14, 2012? Check it.

Fig trees down the left wall of .09 Acres in mid June, 2012.
Yup, pretty darn beastly if I do say so myself. Let's take a look at them in more detail.

4 year old Negronne fig. This plant is almost 6 feet tall and equally as wide. I pruned it heavily in early March to encourage multiple branches to grow from the pruned areas. It is beginning to form a nice multi-stem shrub.
5 year old Violette de Bordeaux fig. This plant is almost 6 feet tall and nearly 8 feet wide. I also pruned it heavily in early March to maintain a mult-stem shrub. It is important for me to prune my figs to a manageable size in such a small yard.
Negronne and Violette de Bordeaux figs. Looking good.
Very young LSU Purple fig. This plant is just over 1 year old and has a long way to go. I actually dug out another fig tree (thought it was a Strawberry Verte fig but it turned out to be a Magnolia fig...they split heavily in high humidity) previously planted in this location and replaced it with the LSU Purple.
6 year old Celeste fig from Paradise Nursery. This is the first fig tree I ever purchased, and now it has really settled into a permanent home. It is 7 feet tall and nearly 9 feet wide. This is always the first fig variety to ripen in my yard, usually in early July. Waiting...
Some of you might be wondering if all the heavy pruning I do in early spring to maintain smaller plants significantly reduces the amount of figs that I harvest. The answer to that question is quite simple. No. Here are two pictures of figs on my Violette de Bordeux fig tree, which I have pruned heavily for 3 years.

Unbelievably prolific variety of fig. But it takes great patience to watch these little VdB figs grow and ripen.
More young VdB figs. I'm optimistic that this will be an epic year for figs.
I plan on taking pictures of these figs again in the winter after they have dropped all their leaves to show the overall form of each multi-stem shrub. I also plan on taking pics during the pruning process next March to better illustrate how I prune my figs. And stay tuned for an update on my fig espalier later this summer.

Happy growing.

Tuesday, May 15, 2012

One Good Reason to Make Your Bed...

...raised.

Check out the standing water in my backyard this evening. Three to four inches deep in some locations and usually very slow to drain.

Standing water at .09 Acres. This is the primary reason I decided to build raised beds in early 2010.

After I purchased my home in 2009, it didn't take me very long to decide between in-ground vs. raised beds. I actually didn't have much of a choice. The low, slow-draining yard dictated what would be best. If I didn't want sopping wet soil and rotting roots, I would have to build raised beds.

So that's what I did. Actually didn't take too long or much material; a weekend, a bunch of 2 x 8s, some wood screws, battery-powered screwdriver, saw, and lots of compost. I even decided to expand and connect my raised beds because of the ease of use and multiple successful harvests.

Now I don't have much to worry about when I come home from work and see this...


...because I already made my bed(s).

Monday, May 14, 2012

Simple Equation for Happy Citrus

Here's a simple equation for happy citrus trees:

Bright sunlight + warm temperatures + ample rain + organic citrus fertilizer = very happy potted lemon and lime trees.

It really is as simple as that. Here are a few pics of my productive lemon tree:

Young lemons developing on the tip of a branch. These lemons grew from flowers that bloomed in early March inside my house. I actually hand-polinated them with the tip of my finger since I don't have a beehive in my house!
Second flush of citrus blossoms in early May. Note the purple/pink buds that are not yet open, the newly opened bloom on the left, the recently pollinated bloom in the center, and the newly developing lemon on the top right portion of the picture.
This year's growth has me very optimistic for a delicious crop of juicy limes and lemons in late fall/early winter, particularly after last year's mediocre citrus season. Actually, it was more my fault than anything else. I placed both potted trees on top of my outdoor table. They blew off during a thunderstorm and suffered some pretty bad damage. The top half of my lime tree snapped off completely! Bad news, but lesson learned. Fingers crossed for 2012.

Saturday, May 12, 2012

Mulch Ado About Nothing

Mulch. Beginning gardeners don't think much about it. "What's the big deal, why all the fuss? It's not necessary, is it?! I can still grow veggies and fruit without it, so why bother?"

Here's my 2 cents on the subject. Mulch is a huge part of my backyard. I use it on my raised beds as well as on the ground beneath my fruit trees, berry canes, flowers, and herbs. Heck, I spread the stuff everywhere!

That's what I'm talking about! 5 cubic yards of mulch delivered from a local garden center. I already spread 2 cubic yards the other weekend, but completely underestimated how much I needed.
Why use mulch? I use mulch for multiple reasons. First, it helps maintain even moisture in my raised beds by minimizing moisture evaporation and blocking bright sunlight from "baking" the soil in brutal summer heat. I use considerably less water in the warm months for my raised beds when they are mulched. Second, it smothers growth from unwanted weeds, grass, and seeds. That's the main reason I use it over my entire backyard, and I will continue to use it so I never have to mow grass again. So far, so good. Third, mulch breaks down over time and adds nutrients and organic material back into to the soil. Fourth, appearance. Mulch adds a uniform look and rich color to any yard or raised beds.

What type of mulch? Mulch comes in dozens of varieties. Hardwood, softwood, ground up trees debris, wheat straw, pine needles (for acid loving plants), cut grass, leaves, rough and fine texture, even recycled tires and other "green" options. Basically, anything that can be applied in a thick layer for the reasons listed above.

Detail pic from the huge mulch pile. It's nearly impossible to shovel this stuff with a regular shovel or spade. Use a pitch fork or special mulch fork instead.
Where can I get some? Most large nurseries and greenhouses carry mulch. I prefer to buy it in bulk (cubic yards) rather than the bagged version from the big box stores. It is considerably cheaper this way. You can also find it at city waste processing facilities. Hit the internet to find the best sources near your house or yard. I also like to look at and feel what I'm buying. All mulch is not the same in quality, color, or general appearance.

Freshly applied wheat straw mulch around recently planted cucumber vines. I covered the entire raised bed with this straw mulch to conserve water and moderate soil temperatures. It also decomposes and adds organic material to the soil.
How should I apply mulch to my yard or raised beds? I won't speak for every gardener because we all have different mulch preferences and uses. But I will tell you what I do at .09 Acres.

For raised beds: I apply 3-4" thick layers of wheat straw over all my raised beds. I simply pull sections of it off a compressed bale of straw and spread it over the beds. Sometimes after a few weeks or decent rain a few sprouts of wheat straw will grow from seeds in the bale, but it is easy to pull them by hand. I delay mulch application on warm-season crops that prefer higher soil temps, like sweet and hot peppers. I let the soil sit exposed in the sun until temps are generally warm, then I mulch. It is May 12 and I still haven't mulched my pepper beds. I likely won't until next month. I also mulch heavily for fall and winter crops. The added layer of protection often means that I can leave root vegetables and hardy greens uncovered (no hoop house or low tunnel).

For the rest of my yard (walking paths and beneath fruit trees): First, I pull any existing weeds or unwanted seedlings from the ground before I spread any mulch. Then, I'm ready to spread a 3-4" thick layer of mulch over the entire yard. It will take me dozens of trips with a wheelbarrow, but I load it with a pitch fork and then push it into my backyard. I then dump the wheelbarrow and repeat the process. Only after I have dozens of piles scattered in my backyard do I attempt to spread it. I use a bow rake rather than a leaf rake because it is stronger and I can use it to push and pull the mulch into a uniformly thick layer.
Three distinct layers of mulch in my backyard. Last year's layer of mulch is visible on the right near the raised beds. This year's layer (not fully spread over entire yard yet) is the dark brown stuff visible on the left.  I will eventually cover all of last year's mulch with a thick layer of new mulch. Also, note the wheat straw mulch directly beneath the fig trees.
Will I still be singing the praises of mulch when I'm sweating my tail off in the midst of shoveling and spreading 5 cubic yards of mulch? Probably not. But as soon as I'm finished, showered, and standing out in the yard with a cold beer in my hand, I'll quickly remember why I do this every year. You should try it to.

Thursday, March 29, 2012

Bee-ware!

This is not good. Another major reason why we should all move toward natural and organic gardening methods. What would we do without our pollinators and honey?!

http://www.wired.com/wiredscience/2012/03/neonicotinoids-bee-collapse/

Put down the problematic poisons and protect our precious pollinators, please!

Wednesday, March 28, 2012

Ready for Radishes

I love radishes. Not the tough, woody, and "hot" store-bought varieties. I'm talking sweet, crisp, and "sharp" home-grown radishes.

When I first started gardening 8 years ago, I heard and read that radishes were one of the easiest vegetables to grow. A real no-brainer. Eager for a quick success, I planted radish seeds and crossed my fingers. What happened? Not much other than disappointment. I grew lots of green radish tops but they all had thin and spindly radish roots. No round edible radishes.

Not one to be easily deterred in the garden, I planted a second packet of radishes and hoped for better results. What happened this time? Same poor results, and an extra dose of disappointment. So much disappointment that I walked away from the radish game. Threw in the towel. Hung up my cleats.

After doing some reading, thinking, and head scratching, I eventually identified my previous mistakes. In past years I planted my radish seeds in nitrogen rich dirt or soil. I also didn't water very often after germination. These two factors almost certainly resulted in poor radish growth. Radishes won't develop large flavorful roots if they have too much nitrogen, but they will grow lush foliage. Radishes are also best when grown quickly. What does that mean? Radishes need a steady supply of water to guarantee rapid growth. Most great radishes will go from seed to harvest to table in less than 1 month. They need lots of moisture.

In recent years and particularly this spring, I think I finally figured out how to grow great radishes. Here are the main factors I try to control:

1. Location - I plant my seeds in a large (24" diameter), deep pot in full sun. The pot provides plenty of space for root growth. It is very thick glazed ceramic with 3 drain holes on the bottom. It holds moisture very well, but also drains properly.

24" diameter ceramic pot filled with well-aged compost and radishes ready for harvest.
2. Soil - I like to use well-aged compost. Not fresh stuff, I'm talking year-old rich compost that isn't loaded with nitrogen. It drains well, contains all nutrients and doesn't require additional fertilizer or minerals, and does the trick for me. I fill up my ceramic pot with 100% compost.

3. Seed spacing and planting - I generally scatter seed on the surface of already-moist compost. I'm not overly concerned with rows or spacing, as long as the seeds aren't clustered together. Then I take a handful of dry compost, scatter that over the seeds, then water again. My top layer of compost is not much more than a dusting. Some seeds are usually slightly exposed. No big deal.

4. Moisture - I keep my radishes well watered. Every day for the first week after sowing. Every third of fourth day after germination. No extra water if it rains. This sounds like a lot of water, but good compost drains rapidly yet still manages to retain the perfect amount of moisture.

Blanche Transparente radishes peaking out of the compost. They are a long white, tapered variety of radish also called White Icicle. Note how the radishes are starting to crest out of the compost.
5. Thinning - Radishes don't require tremendous space but also don't like loads of competition. I will usually thin my seedlings if they are stacked up too tightly.

6. Harvest - Harvest early. Most varieties are ready within 30 days. They taste fresh, crisp, and only mildly spicy when young. Use your best judgement, but don't wait too long before harvesting. I have found that most radishes are not like fine wine...they won't get better with age. Older radishes are tough, woody, and have an overbearing heat to them.

Blanche Transparente radishes on my cutting board. The largest radish was over 7" long, the shorter radishes about 4" long. They were crispy, mild, sweet, and tasted like proper radishes.
7. Varieties - Round; thin; tapered; cylindrical; red; pink; white. You name it, it probably exists. Experiment to find the varieties that you enjoy eating and grow well for you.

These are just my personal observations about growing radishes. Probably too much info and maybe overkill. I still know many gardeners who have great soil, simply toss in a few seeds, water well, then harvest. Simple is always best in the garden. Experiment. Find out what works best for you. Then try to simplify. The only thing left to do after that is eat and enjoy.

Bon Appétit!

Sunday, March 18, 2012

March Madness

The madness has set in. Not college basketball madness. I'm talking spring garden madness. Average temps have been consistently warm for the past few weeks, and I think the plants in the yard believe it is April. Enjoy the following picture tour of March Madness at .09 Acres:

Still harvesting Chantenay Red Core carrots from the garden.
This 18.5 oz carrot dwarfed the 14.1 oz carrot I harvested 2 months ago. I don't have the largest hands, but this octopus-like carrot is ridiculous. This carrot is grown from seed I purchased from Southern Exposure Seed Exchange (SESE).
Japanese maple waking up from winter slumber. This tree was a seedling from parent's old house in Virginia Beach. I also gave a second seedling (now about 8 feet tall) to my friends Elsa and Matt in Norfolk.
Gardeners know that mint is extremely invasive. Here is a half-barrel of mint scrambling for more real estate. 
Rosemary. Yum.
Rosemary blooms. Yum?
Cold hardy mache appears as if it will be going to seed very shortly. It doesn't like hot weather.
Arugula in full bloom. I save seed from this plant every year. It's very easy. Just wait for the seed pods to dry on the plant, then cut the flower stalk and shake the dry pods in a brown bag. Voila! Seeds!!
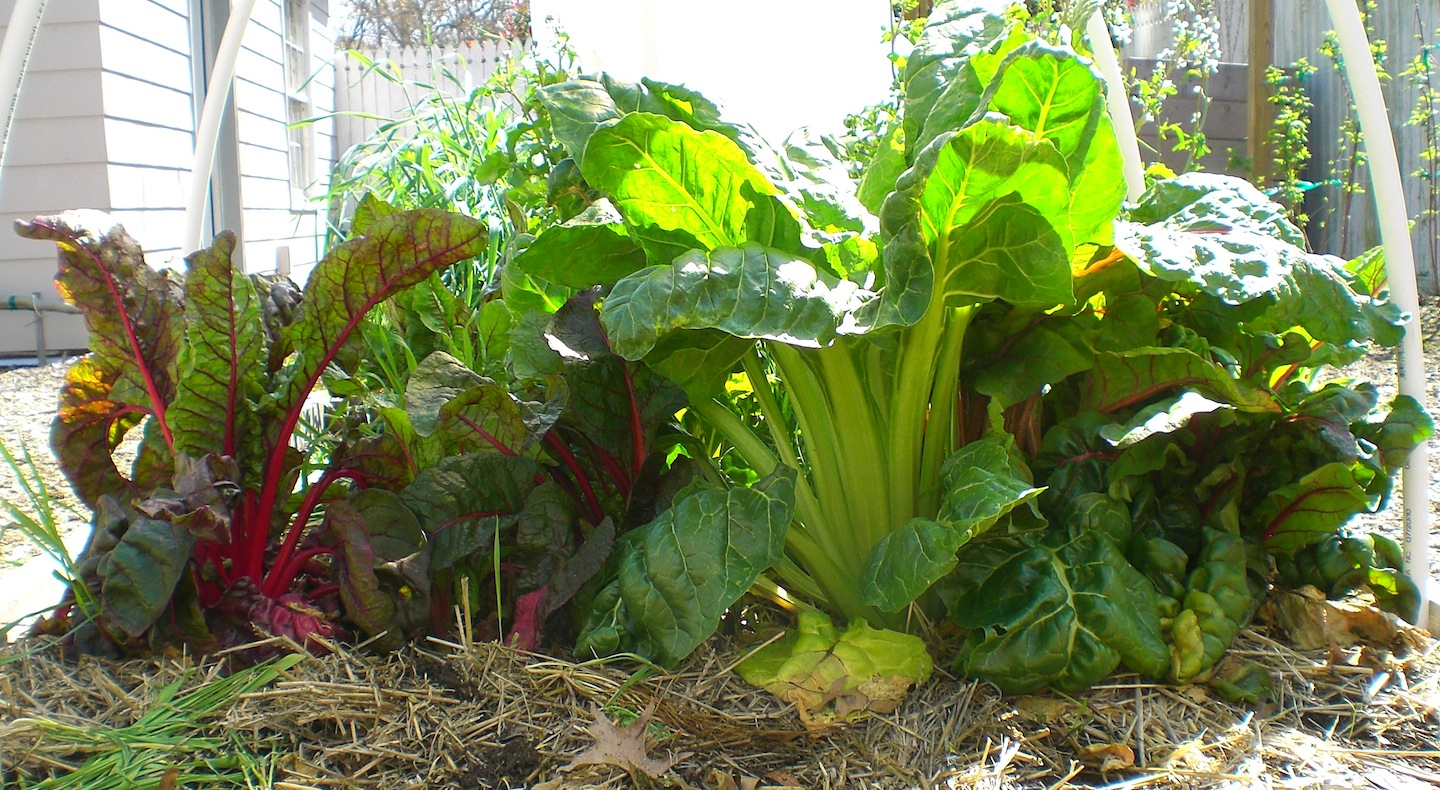
A 4-foot row of various Swiss Chard. This stuff is versatile in the kitchen and grows in all weather conditions.
Ruby Red Chard from SESE.
Kale. I grew my kale exposed all winter. No plastic, floating row cover, or hoop house. Resilient for sure. Try kale soup with chorizo. You won't be disappointed.
Red bunching onion grown from SESE seed sown last fall.
This Calabrese broccoli is destined for pasta with olive oil and garlic.
Winter Density has been the top lettuce producer in my garden for the past two years. The only problem I have is dealing with slugs and aphids that crawl inside the wrinkly leaves. Nothing a little water won't solve.
A row of trellised Fall Gold, Kiwi Gold, and Heritage Red raspberries. These are a must-grow in the Mid-Atlantic and Tidewater area.
Thornless Ouachita blackberries busting loose.
Potted lemon tree preparing to bloom. Looking forward to a better citrus harvest in 2012-13. This past year was disappointing. I only harvested a handful of lemons and limes.
Russian Red Pomegranate (8 feet tall) from Edible Landscaping in Afton, VA.
Russian Red Pomegranate leaves reaching for the sun.
Celeste fig tree (appx. 6 years old) from the now-closed Paradise Nursery. I've pruned this every year in order to encourage a low, wide shrub-like growth. More branches = more figs.
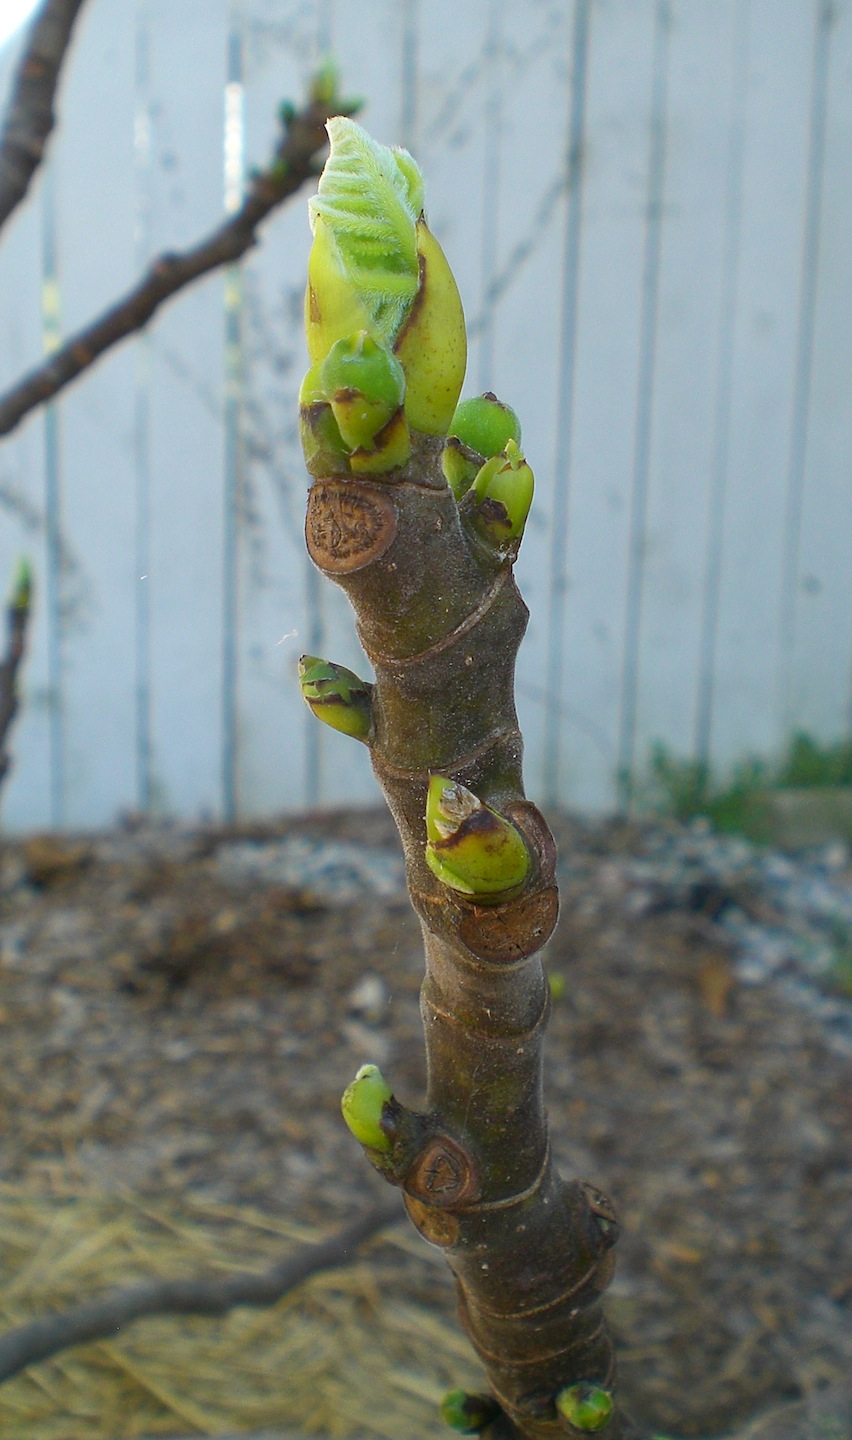
The tip of a Celeste fig tree branch. Notice the combination of new leaves and tiny figs. Some varieties of figs produce 2 harvests per year. The early figs are called brebas.
Another view of the Celeste fig tree. Note the multiple growths on each branch. If I didn't prune, I would have a tall, lanky tree rather than a dense shrub.
My fig espalier at the corner of my garden shed. 3 days ago I pruned off all of last year's vertical growth near the two main horizontal arms. I left a single vertical node from last year's growth in order to allow the new branches to grow from those same locations this year. I will repeat this process year after year. Grow, harvest, prune. Grow, harvest, prune.
Detailed photo of a vertical node extending from a horizontal branch of the Celeste fig espalier. New growth will appear on the rough area of the top portion of the vertical node. New growth will also likely appear elsewhere, but I will prune or rub off the new growth before it negatively impacts the desire appearance of the overall espalier. 
I hope you enjoyed your tour of March Madness at .09 Acres. My apologies for not posting here more consistently during the past few weeks. Work has been eating me alive, and it's great to be back outside again. Wishing you good growing and great harvests in your gardens!