Showing posts with label Seeds. Show all posts

Thursday, June 28, 2012

Ridiculous Radish!

Prior to this summer, I had never saved seeds from a radish. But after a successful and tasty radish growing season this spring, I decided to leave a few unharvested and let them go to seed. It didn't take long before the Blanche Transparente radishes I grew in a large ceramic pot sent their seed stalks skyward.

And I'll be honest, it seemed like a Jack and the Beanstalk experience. The radishes kept growing larger and fatter and the seed stalks kept growing higher and higher. Between March 28 and June 28 the radishes morphed into massive monsters. Have a look at these photos.

5-inch long Blanche Transparente radishes harvested on March 28, 2012.
5-foot long Blanche Transparente radish and seed stalk pulled on June 28, 2012.

Yes, you read that correctly. This particular radish was over 5-feet long from root to seed pods. Here's a close-up of the root next to the pitchfork.

This radish root is longer than the business end of my pitchfork!

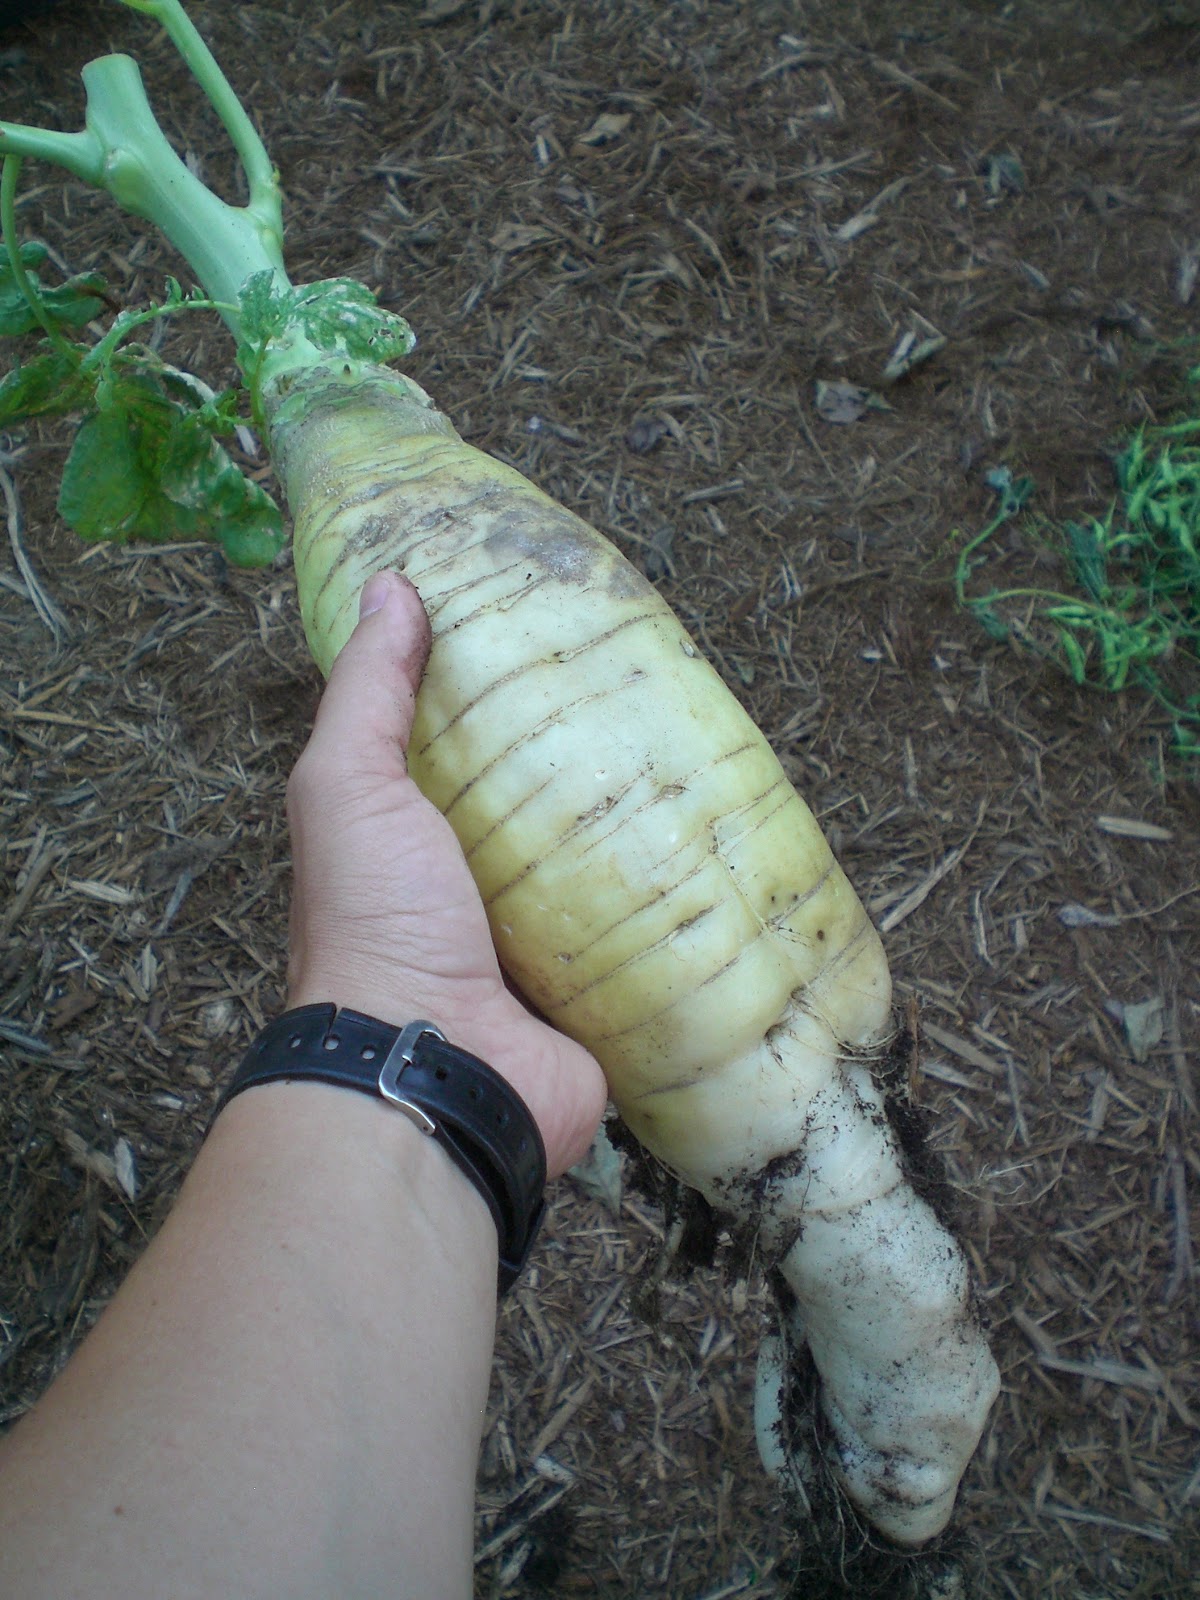
Last but not least, here's a photo of me holding the root. Despite its ridiculous, elephant-trunk-like shape, it was actually fairly light for its size.

Massive Blanche Transparente radish harvested from a ceramic pot.

I cut the seed stalks from each root and left the seed pods intact. They are now tied together and hanging from a rafter in my garden shed to dry out completely before I collect all the seeds.

Ridiculous radish indeed!

Wednesday, March 28, 2012

Ready for Radishes

I love radishes. Not the tough, woody, and "hot" store-bought varieties. I'm talking sweet, crisp, and "sharp" home-grown radishes.

When I first started gardening 8 years ago, I heard and read that radishes were one of the easiest vegetables to grow. A real no-brainer. Eager for a quick success, I planted radish seeds and crossed my fingers. What happened? Not much other than disappointment. I grew lots of green radish tops but they all had thin and spindly radish roots. No round edible radishes.

Not one to be easily deterred in the garden, I planted a second packet of radishes and hoped for better results. What happened this time? Same poor results, and an extra dose of disappointment. So much disappointment that I walked away from the radish game. Threw in the towel. Hung up my cleats.

After doing some reading, thinking, and head scratching, I eventually identified my previous mistakes. In past years I planted my radish seeds in nitrogen rich dirt or soil. I also didn't water very often after germination. These two factors almost certainly resulted in poor radish growth. Radishes won't develop large flavorful roots if they have too much nitrogen, but they will grow lush foliage. Radishes are also best when grown quickly. What does that mean? Radishes need a steady supply of water to guarantee rapid growth. Most great radishes will go from seed to harvest to table in less than 1 month. They need lots of moisture.

In recent years and particularly this spring, I think I finally figured out how to grow great radishes. Here are the main factors I try to control:

1. Location - I plant my seeds in a large (24" diameter), deep pot in full sun. The pot provides plenty of space for root growth. It is very thick glazed ceramic with 3 drain holes on the bottom. It holds moisture very well, but also drains properly.

24" diameter ceramic pot filled with well-aged compost and radishes ready for harvest.
2. Soil - I like to use well-aged compost. Not fresh stuff, I'm talking year-old rich compost that isn't loaded with nitrogen. It drains well, contains all nutrients and doesn't require additional fertilizer or minerals, and does the trick for me. I fill up my ceramic pot with 100% compost.

3. Seed spacing and planting - I generally scatter seed on the surface of already-moist compost. I'm not overly concerned with rows or spacing, as long as the seeds aren't clustered together. Then I take a handful of dry compost, scatter that over the seeds, then water again. My top layer of compost is not much more than a dusting. Some seeds are usually slightly exposed. No big deal.

4. Moisture - I keep my radishes well watered. Every day for the first week after sowing. Every third of fourth day after germination. No extra water if it rains. This sounds like a lot of water, but good compost drains rapidly yet still manages to retain the perfect amount of moisture.

Blanche Transparente radishes peaking out of the compost. They are a long white, tapered variety of radish also called White Icicle. Note how the radishes are starting to crest out of the compost.
5. Thinning - Radishes don't require tremendous space but also don't like loads of competition. I will usually thin my seedlings if they are stacked up too tightly.

6. Harvest - Harvest early. Most varieties are ready within 30 days. They taste fresh, crisp, and only mildly spicy when young. Use your best judgement, but don't wait too long before harvesting. I have found that most radishes are not like fine wine...they won't get better with age. Older radishes are tough, woody, and have an overbearing heat to them.

Blanche Transparente radishes on my cutting board. The largest radish was over 7" long, the shorter radishes about 4" long. They were crispy, mild, sweet, and tasted like proper radishes.
7. Varieties - Round; thin; tapered; cylindrical; red; pink; white. You name it, it probably exists. Experiment to find the varieties that you enjoy eating and grow well for you.

These are just my personal observations about growing radishes. Probably too much info and maybe overkill. I still know many gardeners who have great soil, simply toss in a few seeds, water well, then harvest. Simple is always best in the garden. Experiment. Find out what works best for you. Then try to simplify. The only thing left to do after that is eat and enjoy.

Bon Appétit!

Sunday, February 19, 2012

Broccoli Double Vision

I've been eating lots of hefty carrots recently. This should be evident by my last blog post. Carrots contain Vitamin A, which is an essential nutrient for good vision. Despite my prodigious intake of these health-supporting wonders, I discovered that something was wrong with my eyesight this afternoon.

After lunch, I walked out into the rain to plant some radishes in my garden. I was a few feet from my potted Calabrese broccoli when I started seeing double. I could've sworn I harvested my broccoli last month, but sure enough...side shoots of broccoli had sprouted up everywhere! Double broccoli!!

Side shoots of Calabrese broccoli (left and bottom). I harvested the central head of broccoli on January 19. Notice the off-white area near the center of the picture where I cut the central head with a small knife. Exactly one month later I harvested the side shoots.
Calabrese broccoli is no one trick pony. It grows not once, but twice. Exactly one month had passed from the time of my initial harvest to today's second harvest. Here's a close-up view of some side shoots.

Secondary shoots of Calabrese broccoli growing from the side of a potted plant.

Because of my relatively care-free harvest and positive experience with broccoli this year, I am planning on growing multiple varieties next fall. In addition to Calabrese, I will be sowing seeds of Super Rapini broccoli raab and Romanesco broccoli.

Broccoli varieties for future planting at .09 Acres.

I definitely recommend home-grown broccoli for every gardener, beginner or advanced. You will be pleasantly surprised with your harvest if the plant is grown in compost-rich soil and kept moist. Here's a list of the pros and cons of growing broccoli:

PROS:
  • large central heads of sweet, tender broccoli
  • secondary harvest of side shoots 3-4 weeks after main harvest
  • unbeatable flavor compared to insipid store-bought broccoli
  • extremely tolerant of hard frosts and variable weather
  • can be grown in large pots
  • beautiful blue/green foliage

CONS:

  • young plants are prone to attack by caterpillars
  • needs steady supply of water as a seedling
  • large size when mature (appx. 36" in diameter in my garden) 
  • long time from seed to harvest 

Thursday, January 19, 2012

Back in the Garden Again

My apologies!  It's been well over a month since my last post. The holidays and an INTENSE workload really put a dent in my gardening and blogging time. In the past 6 weeks I've done little in the yard and nothing with the blog.

Considering my neglect of the garden during this period of time, I expected Mother Nature to force me to tighten my belt a notch or two by wreaking total havoc on my tasty veggies and herbs. I imagined hard frosts, harsh winds, and cold dry air conspiring against me. I pictured languishing lettuce, crusty carrots, and beat up beets.

What did I find? Beautiful broccoli.

Calabrese broccoli head approximately 8" in diameter. This plant was grown in a glazed ceramic pot.
Don't think broccoli is beautiful? How about now?

Calabrese broccoli head.
This head of broccoli looks almost like a coral reef you'd expect to see off the Florida Keys rather than in a backyard garden in Newport News, Virginia. This plant was grown from seed in a large glazed ceramic pot. I mulched it with a thick layer of wheat straw after it germinated and haven't fussed over it since then. Yes, I hand-picked a few caterpillars but did little else. It is also growing smaller side shoots that I will only cut after I harvest the main head.

What else did I find that I didn't deserve? A cool cover crop.

Diego standing guard over a 4' x 8' bed of winter rye and hairy vetch cover crop.
I purchased Wren's Abruzzi Winter Rye and Hairy Vetch cover crop seeds last September from Southern Exposure Seed Exchange at the Heritage Harvest Festival at Monticello. I mixed and planted them in a 4' x 8' bed previously occupied by my Inchelium Red garlic. The seeds germinated easily and very quickly filled the bed. It's a vibrant addition to the otherwise muted colors of the winter landscape. I plan to cut and till the cover crop into the bed in early spring before planting tomatoes in late spring.

The cover crop is also important for another reason I did not anticipate. Dogs are natural foragers, and my two dogs often ate grass in my previous yard to aid in digestion. By successfully smothering my grass, I unintentionally eliminated one of their favorite diet supplements. Last summer, I often found my dogs sampling different weeds and other greens because they were looking for a suitable substitute for their favorite but now missing forage. As soon as the cover crop germinated and grew, Diego would regularly run over to the bed and dine on selected shoots of Winter Rye. He still does, seems to love the stuff! So in a way, it's a happy system. Soil feeds cover crop; cover crop feeds soil, dog, and future plants; plants feed human; human feeds cover crop to the soil; repeat. My only concern is that Diego doesn't get comfortable dining on whatever he choses from the raised beds. That could be a problem.

Maybe I'll construct a bone-shaped raised bed for dog edibles...then again, maybe not.

The broccoli and cover crops are just two of the many reasons why Diego and I are beginning to appreciate winter gardening more than summer gardening. There is little to do after planting and germination other than to harvest the rewards of Mother Nature. No toiling, no tilling, no sweating.

Many other veggies are doing very well despite my neglect, but I'll save them for another post. Hope all is well in your gardens.

Thursday, November 3, 2011

Enjoying the Fall Garden

Like many people, I started out as a spring and summer vegetable and fruit gardener. Warm weather meant planting and harvesting. Cold weather meant waiting for next year's harvest.

It took me a few years and lots of trial and error to realize that cool season gardening can sometimes be the most rewarding gardening of all. The most notable differences between fall and summer gardening in Zone 7b are comfortable temps, very few bugs and pests, care-free veggies, and generally easy tasks. 

In its simplest form, fall gardening consists of sowing seed (in late summer), watering, mulching, more watering, and harvesting. That's just about all there is to it. Some hardier crops even survive repeated frosts and in a location like Newport News, VA, a productive four season garden is a realistic goal. 

I took the following photos of my fall garden at .09 Acres on Halloween, 2011.  

Long rows of Buttercrunch and Winter Density lettuce.
Young Rouge d'Hiver lettuce sown in succession with other lettuce varieties to extend the harvest. Succession planting spreads out the harvest over a few weeks or months.
Long Standing Bloomsdale spinach. This is my first attempt at growing spinach. I found that warmer soil temps in late September definitely hindered germination, but the spinach seems much happier in early November.
I had spotty germination of my carrots. Notice that the center two rows filled out nicely while the outer rows (far left and far right) are fairly sparse. I'll have to wait and see how they do this year. Last year was an amazing year for carrots.
It's tough to beat good beets. Here are four short rows of Detroit Dark Red and Chioggia beets. These are still quite young and probably need another month to grow. I thinned them in mid-October to allow the beet roots to grow larger, and I added the thinned greens to a salad. Definitely a great addition.
I am growing kale from seeds I saved (this spring) from last years kale plants. I battled tiny caterpillars for a few weeks when the plants were young, and you can see some of the leaf damage they caused in this picture. 
I am growing broccoli in two large pots and in a raised bed. I'm curious to see whether it grows better in-ground or in the pots. I can't remember if I planted Calabrese or Waltham broccoli. I have to check my seek packet. I may have started these seeds too late for the plants to mature in time to produce harvestable broccoli, but only time will tell. The tiny caterpillars that hit my kale also like the broccoli. Damage is visible on the right-most leaf.
Apple mint growing in half a wine barrel near the gate to my yard. It has made an amazing comeback from the crippling heat of mid-summer. This plant thrives in mid-late spring, suffers through summer, then regrows with a vengeance in fall. This entire barrel grew from a small rooted cutting I dug up from a yard where I previously lived. Mint will take over the world if it's not contained, but it's also a must-have in any yard.
Russian Red pomegranate ready for harvest. There are appx. twenty of these hanging from my 4-year old pomegranate tree. I can't say enough good things about this tree.
Negronne figs that definitely will not have enough time to ripen before the first frost. This tree keeps growing larger and producing more figs. Next year should be an amazing harvest. 
Two unripe Eureka lemons hanging from a small branch on my potted tree.
New foliage on my Eureka lemon. It usually starts out with a reddish tinge, then turns bright green as the leaves grow and mature.
More blossoms keep appearing on my potted Bearss lime tree. Citrus flowers are arguably some of the best smelling flowers in nature. My lime tree is currently holding about 10 limes. After last year's harvest, I thought it could've grown 50 limes this year. But a strong gust of wind knocked it off a table in early spring and snapped off the main trunk. I'm pretty sure I cried when I finally found out what happened.
Baby Bearss limes growing from recently pollinated flowers. I won't be dining on these limes for a LONG time!
What are your favorite fruits and veggies to grow in the fall? Are you thinking about adding additional cold-weather protection like floating row covers or plastic-covered hoop houses to extend your harvest into the winter? Fall is finally here so welcome it into your garden.


Friday, September 30, 2011

Late September

Late September at .09 Acres is a transitional period in the garden. The fig trees are lush and still loaded with a secondary crop of figs, reminiscent of mid-summer flavors. The slightly cooler weather, ripening pomegranates, and newly planted lettuce and spinach seedlings welcome the arrival of fall.

I put together this photo-mosaic on September 29 to give you an idea of what's taking shape in the yard. Please disregard the sunbathing hairless terrier lounging between the raised beds.

September at .09 Acres in Newport News, Virginia.
If you compare this picture with the main photo in the banner of my blog, you'll notice some pretty significant changes. The fig trees are quickly filling out against the south-facing fence (left). The espalier fig is reaching for the sky agains the shed (back left, near center). The raspberries and blackberries are looking a bit rough after the hot summer (back right). The peach tree has been replaced by 3 small rabbiteye blueberry bushes (right). I've found that peaches are nearly impossible to grow organically in this climate. And the pomegranate tree is flourishing (near right). I've also kept the grass and weeds in check with diligent digging, weeding, and mulching.

The raised vegetable beds look nearly naked, with the exception of a few emerging seedlings. You can see beet and carrot seedlings mid left and lettuce planted at staggered intervals near right. Within 30-45 days I'll be harvesting lettuce, spinach, radishes, and chard. I also plan on covering most beds with hoop houses to extend the growing season. They will also act like outdoor refrigerators keeping plants growing slowly but well preserved even during periods of frost and snow.

Tuesday, September 27, 2011

Rain, Rain, Go Away...

We've had rain here in Newport News for the past week. I'm talking lots of rain. Morning, noon, night.

The rain has been a bad thing and a good thing. I'll start with the bad. My last few precious tomatoes from a generally measly summer crop were ripening on the vine last week. I was hoping for one last harvest. Then the rain moved in. It split the skins of my Black from Tulas and they quickly went downhill from there. See for yourself.

Black from Tula tomatoes after a week of relentless rain.
The rain brought somewhat cooler temps for a day or two, but then the temps climbed back into the 80s as the rain continued to fall. The warm, wet conditions weren't great for the tomatoes, but it was ideal for MUSHROOMS. I woke up last Friday morning and there were mushrooms as far as the eye could see!  I'm talking hundreds, if not thousands, of mushrooms in my backyard.

Cluster of small tan mushrooms in the garden.
There seemed to be two different varieties of mushrooms, and it was interesting to note that they grew wherever I had spread wood mulch earlier in the spring. I guess the wood chips contained the spores even before I spread them in the yard, or the spores found the moist wood mulch an ideal environment for growing. Either way, .09 Acres turned into a mushroom farm overnight. I don't know much about mushrooms, but I wasn't taking any culinary chances. I took my cues from my dogs and the neighborhood wildlife. Since they wouldn't eat them, I wouldn't either. There were so many mushrooms that even the resident Smurf population had a hard time navigating their way around .09 Acres.

Papa Smurf navigating his way around a morass of rogue mushrooms.
Rotten tomatoes and a plethora of mushrooms were two ill-effects of constant rain. But the upside of all that moisture was ideal seed-starting conditions. Before the rain, I planted a variety of seeds including broccoli, kale, beets, carrots, onions, Swiss chard, spinach, and lettuce.  Almost all of the seeds germinated, and I'll provide a detailed update about my fall garden in an upcoming blog post.  

Stay dry and keep your fingers crossed for cooler weather.

Monday, September 19, 2011

Heritage Harvest Festival

Last Saturday, the family and I attended the 5th Annual Heritage Harvest Festival at Thomas Jefferson's Monticello in Charlottesville, Virginia.

Image courtesy of the Heritage Harvest Festival. Jefferson's Monticello is on the top left of the image, and his terraced vegetable garden and orchard is located along the right side of the image.
Jefferson was a pioneer of and ultimate advocate for sustainable agriculture, and this made Monticello the perfect location for this great event. In short, the festival included everything from seed sales and heirloom tomato and watermelon tastings to hands-on workshops, presentations, and tours of Jefferson's amazing home, garden, and orchard. I highly recommend this event for anybody interested in all aspects of agriculture and simpler ways of living.

I could write pages and pages about the importance of everything presented at the event, but I figure most people who read this blog likely agree that a handful of seeds, the sweat of your brow, and dirt on your hands can lead to some pretty amazing things. Instead, here is a photo-journey of Thomas Jefferson's garden.

Southwest view of Jefferson's expansive vegetable garden. He located it on a south slope to maximize the sunlight, growing seasons, and air movement down the slope.
Peach and other fruit trees in Jefferson's orchard (center of image). Corn is visible in the left foreground, blooming rosemary on the right, and I'm not sure what's blooming in the center.
A staggered row of sea kale.
A lush bed of sweet potatoes.
Tree onions, also called top-set or walking onions, are very hardy perennial and multiplying top-setting onions. This means that they form new onion bulblets where most onions form flowers. They don't produce very large bulbs, but they are fun to grow and nearly impossible to kill. If you've never tried growing onions, start with these to boost your confidence.
Two rows of onions in between peppers and squash.
French artichokes and a nifty wooden plant label.  Each row of veggies, herbs, and flowers was clearly identified by these labels, which made it much easier to identify specific varieties of plants.
I had never seen sesame before, other than on my bagels, but Jefferson's garden was loaded with it.  Each one of these pods is filled with sesame seeds. I broke open one of the drier, yellow pods with my fingers and seeds spilled onto the ground. I can't think of any other museum or heritage site where you can touch AND break part of the display or exhibit without being arrested!
This West Indian Gherkin (cucumis anguria) caught my eye. This beast doesn't look safe or edible...probably why it remained untouched.
Faded sign on a weathered fence that surrounds Jefferson's old nursery. 
Mulched pathway that cuts through the nursery. In the background you can see the edge of the vineyard.
In the orchard. Jefferson loved peaches and fought the noble fight that we still know today as "growing peaches organically". He had about as much success as we do today... 
Aerial view of Monticello not taken by me. I don't have a helicopter or a proper photo credit.
If you are interested in specific information about Jefferson's agricultural successes and failures at Monticello, you should read Thomas Jefferson's Garden Book. It's a compilation of his horticultural diaries, letters, and sketches. Probably more info than you ever wanted to know about the principal author of the Declaration of Independence and third President of the United States. For example, you'll read in his own words about his love of sweat peas, his favorite veggie. Random, but true.

Did anybody else attend the Heritage Harvest Festival this past weekend? Have you ever been to Monticello? I look forward to hearing from you.

Monday, February 14, 2011

Starting Seeds

It's almost seed starting time.  With that in mind, I spent some time over the past few days readying my seed starting operation in my shed.  It's a fairly simple operation with only 4 ingredients: seeds, seed starting mix, heat, and light.  Fortunately I have saved many seeds from the past few growing seasons so I've got that covered.  I also have leftover sterilized seed starting mix.  It retains moisture but also drains well.  And last spring I decided to get serious and devote a few bucks to the heat and light portion of this equation.  What did I buy?  Heat mats and simple fluorescent light fixtures.  Nothing too fancy.  One heat mat was also a gift, thanks Frank and Robin.

From top to bottom: two 4-foot fluorescent light fixtures, seed trays, and heat mat.  
The first photo is my exact setup from last year.  This year I wanted to expand the operation to grow even more plants so I doubled it.  I now have two heat mats that hold four seed trays (8 total), four light fixtures (each holds two bulbs), and timers for the lights.

I had trouble fitting the whole setup in a single picture so I opted for this view.  Not a great shot but it gives you an idea of what it looks like.
Automated timer.
The automated timer makes everything easy.  I can program it to come on early and turn off late in order to provide maximum light for my UV-hungry seedlings.  I don't have to get up early or stay up late to fiddle with lights.  You can call me lazy, but I call it efficiency.  I also like to keep the lights very close (within a few inches) of the seedlings. Strong light leads to thicker, sturdier, stronger plants.  Low light leads to weak, spindly plants.  The lights are on chains so I can raise them incrementally as the plants grow taller.

You can also buy thermostats to control your heat mats. Unfortunately I don't have thermostats so I keep a thermometer and humidity gauge nearby for reference.  It's not the most accurate gizmo but it's a good reference.

Pick one of these up at your local hardware store.
I'm still trying to sort out what I will start in the seed trays.  Definitely the longer growing season staples like tomatoes, peppers, etc.  I usually transplant those to slightly larger containers and place them back on the heat mats for further growth before planting them outside. I also plan on starting lettuce and other veggies.  I don't recommend growing root veggies like carrots, beets, or radishes in trays.  They do better when directly sown in the garden.  And fast growing plants like cucumbers aren't usually worth growing in cells.  I also sow those directly outdoors.

What do you do to prepare plants for the upcoming season?  Peat pots, cups of seeds on a bright windowsill, pots outdoors?  Wait for warmth and plant in the garden?  I'd love to hear from you.  I'll post again after I start the process and germination is underway.

Sunday, January 23, 2011

Read the Seed

Seed catalogs have been trickling in through the mail for the past few weeks.  Now it's time to read.  And plan.  Nothing beats planning for the upcoming year in the garden, particularly when it's cold and nasty outside.


I'm currently picking through Southern Exposure, Seeds of Change, Johnny's, and Edible Landscaping.  These aren't the only sources out there, but they are all good.  The first two primarily sell seeds.  Johnny's sells seeds and equipment, and Edible sells plants of various sizes.

I've been selecting heirlooms for the past few years and saving seeds from each harvest.  This has allowed me to build up a significant collection of various seeds that do well in hot and humid coastal Virginia.  They've become my go-to seeds.  Mostly tomatoes, peppers, cucumbers, lettuces, radishes, carrots.  But my eyes are always open for new crops to experiment with.

I'm considering buying a second pomegranate tree from Edible because the other one is doing so well in my yard.  I'm also looking at their offering of cascade hops (for home brewing).  Hops are perennials and grow quite tall.

What is everybody planning in 2011 for their gardens and yards?