Showing posts with label Organic Gardening. Show all posts

Wednesday, August 29, 2012

Citrus Brown Rot

I was walking past my potted citrus trees, not really giving them more than a casual glance, when something unusual caught my eye. It was a big nasty brown area on a large but immature lemon.

Ugly looking lemon with a huge brown splotch.
I picked it off the tree and gave it a closer look. It actually had the appearance of a bulls-eye; brown concentric rings spreading from a circular center. I walked inside and fired up the Google while the bulls-eye stared back at me.

After a quick research session, I concluded that this lemon suffered (it's now deceased, I chucked it in the bin) from Citrus Brown Rot. According to the UC Pest Management Guidelines:

"Brown rot is caused by multiple species of Phytophthora when conditions are cool and wet. Brown rot develops mainly on fruit growing near the ground when Phytophthora spores from the soil are splashed onto the tree skirts during rainstorms; infections develop under continued wet conditions. Fruit in the early stage of the disease may go unnoticed at harvest and infect other fruit during storage."

Phytophthora is a tongue twister. It's also sort of like a fungi but also different. I won't get into the biological details. Not because I don't want to bore you, but because I don't understand most of it.

Guess where this lemon was growing? Yup, about four inches off the ground. We received over 10 inches of rain in the past five days and conditions have been generally wet and humid for two months. So basically perfect conditions for this stuff to thrive.

While I was fairly confident I correctly identified the ailment, I was more than disappointed that the person who named said ailment was less than creative. Citrus Brown Rot. Seriously? What about something like Brown Cyclops Syndrome or Ring of Suffering?

Citrus Brown Rot. It's a small price to pay for organic growing.

Thursday, March 29, 2012

Bee-ware!

This is not good. Another major reason why we should all move toward natural and organic gardening methods. What would we do without our pollinators and honey?!

http://www.wired.com/wiredscience/2012/03/neonicotinoids-bee-collapse/

Put down the problematic poisons and protect our precious pollinators, please!

Wednesday, March 28, 2012

Ready for Radishes

I love radishes. Not the tough, woody, and "hot" store-bought varieties. I'm talking sweet, crisp, and "sharp" home-grown radishes.

When I first started gardening 8 years ago, I heard and read that radishes were one of the easiest vegetables to grow. A real no-brainer. Eager for a quick success, I planted radish seeds and crossed my fingers. What happened? Not much other than disappointment. I grew lots of green radish tops but they all had thin and spindly radish roots. No round edible radishes.

Not one to be easily deterred in the garden, I planted a second packet of radishes and hoped for better results. What happened this time? Same poor results, and an extra dose of disappointment. So much disappointment that I walked away from the radish game. Threw in the towel. Hung up my cleats.

After doing some reading, thinking, and head scratching, I eventually identified my previous mistakes. In past years I planted my radish seeds in nitrogen rich dirt or soil. I also didn't water very often after germination. These two factors almost certainly resulted in poor radish growth. Radishes won't develop large flavorful roots if they have too much nitrogen, but they will grow lush foliage. Radishes are also best when grown quickly. What does that mean? Radishes need a steady supply of water to guarantee rapid growth. Most great radishes will go from seed to harvest to table in less than 1 month. They need lots of moisture.

In recent years and particularly this spring, I think I finally figured out how to grow great radishes. Here are the main factors I try to control:

1. Location - I plant my seeds in a large (24" diameter), deep pot in full sun. The pot provides plenty of space for root growth. It is very thick glazed ceramic with 3 drain holes on the bottom. It holds moisture very well, but also drains properly.

24" diameter ceramic pot filled with well-aged compost and radishes ready for harvest.
2. Soil - I like to use well-aged compost. Not fresh stuff, I'm talking year-old rich compost that isn't loaded with nitrogen. It drains well, contains all nutrients and doesn't require additional fertilizer or minerals, and does the trick for me. I fill up my ceramic pot with 100% compost.

3. Seed spacing and planting - I generally scatter seed on the surface of already-moist compost. I'm not overly concerned with rows or spacing, as long as the seeds aren't clustered together. Then I take a handful of dry compost, scatter that over the seeds, then water again. My top layer of compost is not much more than a dusting. Some seeds are usually slightly exposed. No big deal.

4. Moisture - I keep my radishes well watered. Every day for the first week after sowing. Every third of fourth day after germination. No extra water if it rains. This sounds like a lot of water, but good compost drains rapidly yet still manages to retain the perfect amount of moisture.

Blanche Transparente radishes peaking out of the compost. They are a long white, tapered variety of radish also called White Icicle. Note how the radishes are starting to crest out of the compost.
5. Thinning - Radishes don't require tremendous space but also don't like loads of competition. I will usually thin my seedlings if they are stacked up too tightly.

6. Harvest - Harvest early. Most varieties are ready within 30 days. They taste fresh, crisp, and only mildly spicy when young. Use your best judgement, but don't wait too long before harvesting. I have found that most radishes are not like fine wine...they won't get better with age. Older radishes are tough, woody, and have an overbearing heat to them.

Blanche Transparente radishes on my cutting board. The largest radish was over 7" long, the shorter radishes about 4" long. They were crispy, mild, sweet, and tasted like proper radishes.
7. Varieties - Round; thin; tapered; cylindrical; red; pink; white. You name it, it probably exists. Experiment to find the varieties that you enjoy eating and grow well for you.

These are just my personal observations about growing radishes. Probably too much info and maybe overkill. I still know many gardeners who have great soil, simply toss in a few seeds, water well, then harvest. Simple is always best in the garden. Experiment. Find out what works best for you. Then try to simplify. The only thing left to do after that is eat and enjoy.

Bon Appétit!

Sunday, March 18, 2012

March Madness

The madness has set in. Not college basketball madness. I'm talking spring garden madness. Average temps have been consistently warm for the past few weeks, and I think the plants in the yard believe it is April. Enjoy the following picture tour of March Madness at .09 Acres:

Still harvesting Chantenay Red Core carrots from the garden.
This 18.5 oz carrot dwarfed the 14.1 oz carrot I harvested 2 months ago. I don't have the largest hands, but this octopus-like carrot is ridiculous. This carrot is grown from seed I purchased from Southern Exposure Seed Exchange (SESE).
Japanese maple waking up from winter slumber. This tree was a seedling from parent's old house in Virginia Beach. I also gave a second seedling (now about 8 feet tall) to my friends Elsa and Matt in Norfolk.
Gardeners know that mint is extremely invasive. Here is a half-barrel of mint scrambling for more real estate. 
Rosemary. Yum.
Rosemary blooms. Yum?
Cold hardy mache appears as if it will be going to seed very shortly. It doesn't like hot weather.
Arugula in full bloom. I save seed from this plant every year. It's very easy. Just wait for the seed pods to dry on the plant, then cut the flower stalk and shake the dry pods in a brown bag. Voila! Seeds!!
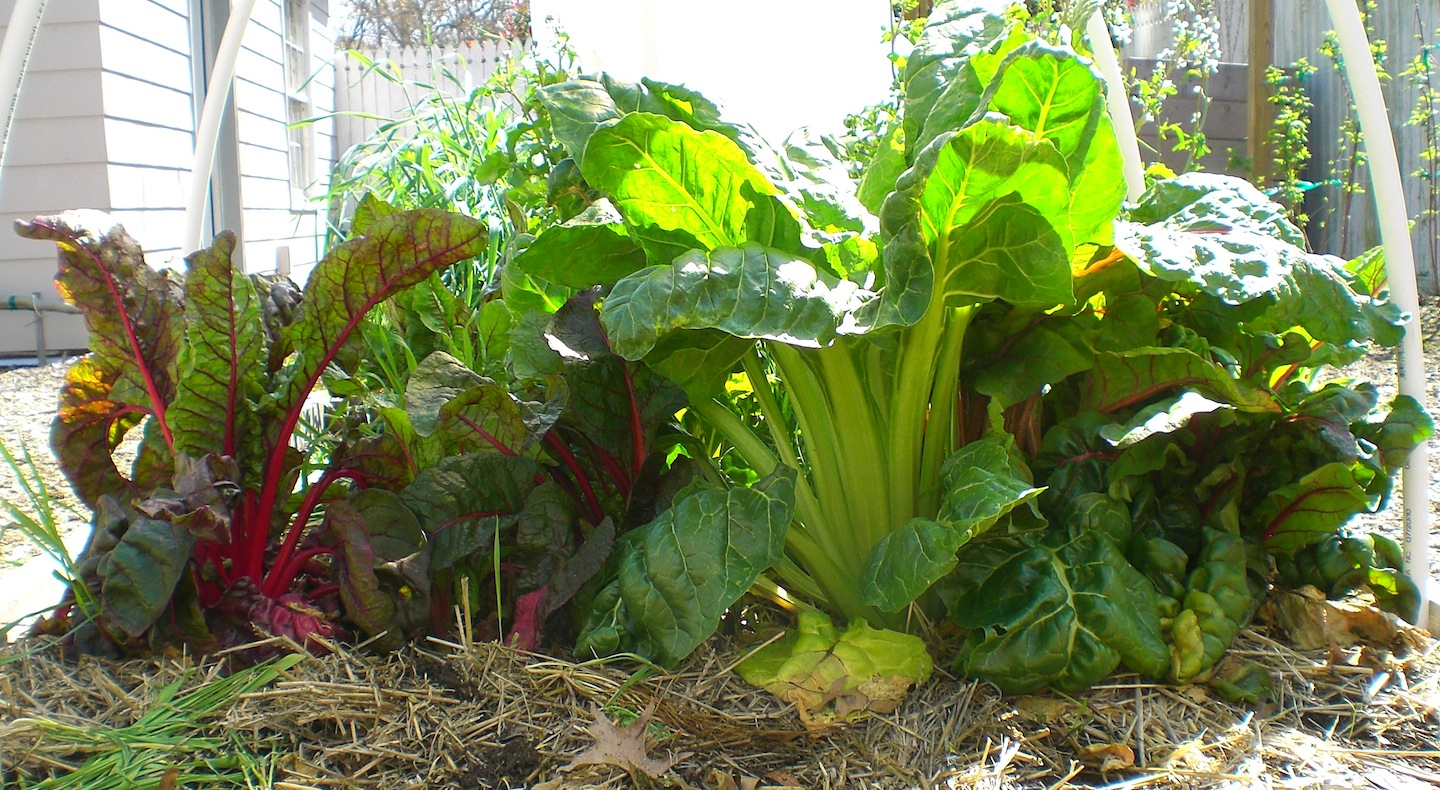
A 4-foot row of various Swiss Chard. This stuff is versatile in the kitchen and grows in all weather conditions.
Ruby Red Chard from SESE.
Kale. I grew my kale exposed all winter. No plastic, floating row cover, or hoop house. Resilient for sure. Try kale soup with chorizo. You won't be disappointed.
Red bunching onion grown from SESE seed sown last fall.
This Calabrese broccoli is destined for pasta with olive oil and garlic.
Winter Density has been the top lettuce producer in my garden for the past two years. The only problem I have is dealing with slugs and aphids that crawl inside the wrinkly leaves. Nothing a little water won't solve.
A row of trellised Fall Gold, Kiwi Gold, and Heritage Red raspberries. These are a must-grow in the Mid-Atlantic and Tidewater area.
Thornless Ouachita blackberries busting loose.
Potted lemon tree preparing to bloom. Looking forward to a better citrus harvest in 2012-13. This past year was disappointing. I only harvested a handful of lemons and limes.
Russian Red Pomegranate (8 feet tall) from Edible Landscaping in Afton, VA.
Russian Red Pomegranate leaves reaching for the sun.
Celeste fig tree (appx. 6 years old) from the now-closed Paradise Nursery. I've pruned this every year in order to encourage a low, wide shrub-like growth. More branches = more figs.
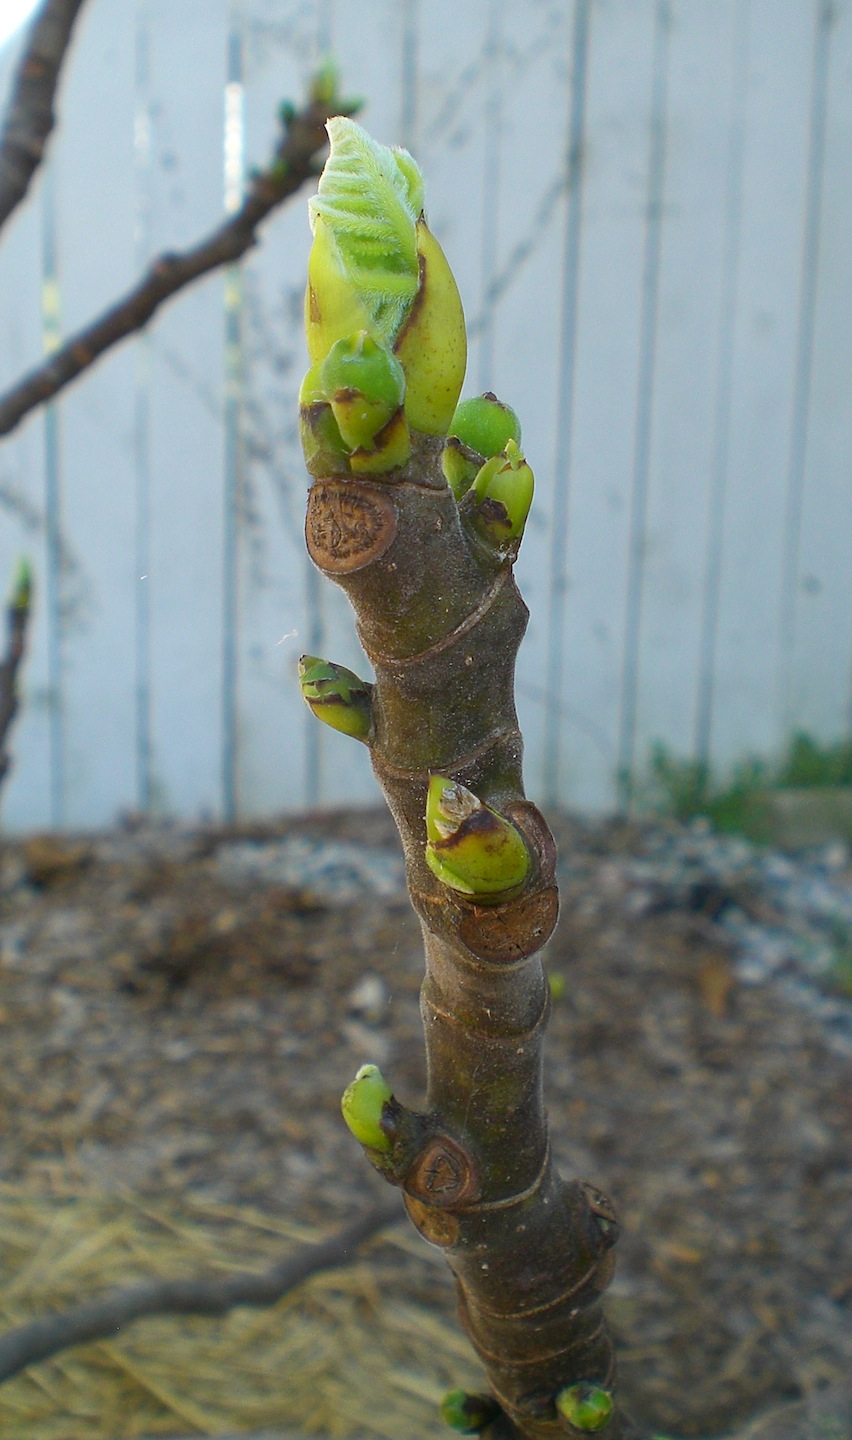
The tip of a Celeste fig tree branch. Notice the combination of new leaves and tiny figs. Some varieties of figs produce 2 harvests per year. The early figs are called brebas.
Another view of the Celeste fig tree. Note the multiple growths on each branch. If I didn't prune, I would have a tall, lanky tree rather than a dense shrub.
My fig espalier at the corner of my garden shed. 3 days ago I pruned off all of last year's vertical growth near the two main horizontal arms. I left a single vertical node from last year's growth in order to allow the new branches to grow from those same locations this year. I will repeat this process year after year. Grow, harvest, prune. Grow, harvest, prune.
Detailed photo of a vertical node extending from a horizontal branch of the Celeste fig espalier. New growth will appear on the rough area of the top portion of the vertical node. New growth will also likely appear elsewhere, but I will prune or rub off the new growth before it negatively impacts the desire appearance of the overall espalier. 
I hope you enjoyed your tour of March Madness at .09 Acres. My apologies for not posting here more consistently during the past few weeks. Work has been eating me alive, and it's great to be back outside again. Wishing you good growing and great harvests in your gardens!

Thursday, February 23, 2012

Good Cause + Donation = Fig Cuttings

My friend and fellow garden blogger Sybil is celebrating a milestone birthday by biking 200 miles for a charity fundraiser.

http://usefulgardens.blogspot.com/2012/02/figs-figs-figs-cuttings-for-you-help.html

If you are interested in supporting her cause with a donation, she will send you your choice of a dozen fig cuttings from some of the most amazing varieties of fig trees. And Sybil knows her figs -- she and her husband owned Paradise Nursery, a well-respected and sorely missed nursery of fig trees and other edibles in Virginia Beach that closed a few years ago.

Violette de Bordeaux figs ripening in late summer.

Don't miss this opportunity. Support a good lady and good cause, help some teens, and get some incredible fig cuttings from one of the most respected fig growers on the East Coast!

If you are interested in donating but unsure how to turn fig cuttings into fig trees, check out these two links:

http://point09acres.blogspot.com/2011/07/propagating-figs.html
http://figs4fun.com/basics_Rooting.html

Sunday, February 19, 2012

Broccoli Double Vision

I've been eating lots of hefty carrots recently. This should be evident by my last blog post. Carrots contain Vitamin A, which is an essential nutrient for good vision. Despite my prodigious intake of these health-supporting wonders, I discovered that something was wrong with my eyesight this afternoon.

After lunch, I walked out into the rain to plant some radishes in my garden. I was a few feet from my potted Calabrese broccoli when I started seeing double. I could've sworn I harvested my broccoli last month, but sure enough...side shoots of broccoli had sprouted up everywhere! Double broccoli!!

Side shoots of Calabrese broccoli (left and bottom). I harvested the central head of broccoli on January 19. Notice the off-white area near the center of the picture where I cut the central head with a small knife. Exactly one month later I harvested the side shoots.
Calabrese broccoli is no one trick pony. It grows not once, but twice. Exactly one month had passed from the time of my initial harvest to today's second harvest. Here's a close-up view of some side shoots.

Secondary shoots of Calabrese broccoli growing from the side of a potted plant.

Because of my relatively care-free harvest and positive experience with broccoli this year, I am planning on growing multiple varieties next fall. In addition to Calabrese, I will be sowing seeds of Super Rapini broccoli raab and Romanesco broccoli.

Broccoli varieties for future planting at .09 Acres.

I definitely recommend home-grown broccoli for every gardener, beginner or advanced. You will be pleasantly surprised with your harvest if the plant is grown in compost-rich soil and kept moist. Here's a list of the pros and cons of growing broccoli:

PROS:
  • large central heads of sweet, tender broccoli
  • secondary harvest of side shoots 3-4 weeks after main harvest
  • unbeatable flavor compared to insipid store-bought broccoli
  • extremely tolerant of hard frosts and variable weather
  • can be grown in large pots
  • beautiful blue/green foliage

CONS:

  • young plants are prone to attack by caterpillars
  • needs steady supply of water as a seedling
  • large size when mature (appx. 36" in diameter in my garden) 
  • long time from seed to harvest 

Saturday, February 11, 2012

14.1 Ounce Carrot

I usually don't like posting about the same topic twice in a row, but I don't have a choice. You have to see the ridiculous carrot I harvested yesterday.

14.1 ounce Chantenay Red Core carrot.
I was blown away when I plucked this Chantenay Red Core carrot from the garden. It is the largest carrot I've ever grown and weighs in at a respectable 14.1 ounces! The craziest part is that I didn't pay any attention to it after I planted it last fall. Sure, I watered religiously the first few weeks to make sure the soil was moist, but other than that I didn't do anything special or attempt to grow large veggies. No fertilizer, no plant growth hormone, nothing.

The above picture doesn't really do it justice. Some people have large hands, others have small hands. Mine are somewhere in the middle. So I decided to take another photo for scale and perspective.

14.1 ounce carrot meets a 12.0 ounce Newcastle Brown Ale.
People like me who never go to the gym and enjoy a beer or two sometimes joke about doing 12 ounce curls to stay in shape. I think I may toughen my workout by doing some 14.1 ounce curls instead.

Here's one final photo of the carrot. It's looking a little drab after spending the night in the fridge, but it is still a heavyweight.  Check it.

14.1 ounce carrot meets a 1/2 gallon of Stonyfield milk.
Seriously. That's a single carrot holding its own against a 1/2 gallon of milk. No Photoshop. Anybody else hauling trophy root vegetables from their garden?  

Monday, January 30, 2012

Area 52: Growswell

WARNING: No flavors were harmed during the growing of these life forms.

Date: January 30, 2012
Time: 5:27pm EST
Location: A tiny vegetable garden in southeastern Virginia

Description: A humble backyard gardener, eager to add some flavor and nutrition to his evening salad, harvests a carrot. The carrot pulls easily from the fluffy composted garden soil. He shakes off some loose soil, trims the top, and then rinses the carrot. A textbook appearance. Eager to eat a second carrot out of hand while preparing his salad, he reaches back into the garden. He tugs on a green stalk, but the root does not budge. He pulls harder, and the carrot only seems to resist even more. "Feels like this thing is gripping the earth," he thinks to himself. After uttering a few foul oaths and grunting harder, the gardener finally extracts something unfamiliar.

Uncertain of what he just harvested, he holds the unknown item under a bright beam from a spotlight on the house for a closer inspection. The hair on the back of his neck suddenly tingles and stands on end, and his skin crawls with goose bumps. A dull thump is heard as he drops the thing at his feet. A shriek rings out into the night. "Dear god what is this thing?!"

Fearing that he has created a monster, the gardener runs inside the house, bolts the back door, and turns off the lights. After taking a few seconds to gather his thoughts and steady his breathing, he realizes there is only one logical reason for this aberration: It was deposited in his yard by creatures from another planet!

In a panic, he dashes back outside and scoops up the perfect carrot and anomalous beast. He snaps a quick photo to document the alien creature. He saves the picture on a memory stick. He wants proof of its existence. 

Then the gardener hears a knock at his front door. Already panicked, he begins to get suspicious. The gardener stashes the memory stick in his dirty laundry basket and runs back to his kitchen, camera in hand. Suddenly, government agents come crashing through the front door, their silhouettes illuminated by the glow of a dozen unmarked black Chevy Suburbans. Simultaneously, he hears the thump of propeller blades overhead and men in black fatigues swing down on ropes and smash through his windows. Special Ops troops surge into the fenced yard and begin shooting at all vegetables in the raised beds. 

It was over in seconds. The camera was destroyed and the broken bits confiscated. The gardener could find no trace of the perfect carrot and its deviant alien counterpart. Completely gone. Scientists quickly followed with all kinds of analytical gadgets, probing and sampling the soil and confiscated vegetables. The interrogation began, but was brief. Regardless, it took the boogeymen mere minutes to set up a safety perimeter and restrict all access to the newly designated AREA 52: Growswell.

AREA 52: Growswell, VA.

"Why Growswell," the gardener asked? 
"Because that thing grows well here," the agent said.
"WHAT grows well here?!" the gardener yelled. Before he could even finish his sentence, they were gone.

After the agents left, the gardener returned to his laundry basket and fished out the memory stick. Fearing for his own safety, but fearing for the safety of the planet if he didn't tell his story, the gardener uploaded the picture of his carrot and the extra-terrestrial being to his blog to offer proof of its existence.

A Chantenay Red Core carrot of classic appearance and creature from another planet.

The image of the alien grown in the gardener's backyard has now gone viral, carrying with it the intrigue it rightly deserves. Shrouded in mystery, the backyard vegetable garden alien now stands tall amidst the ranks of fabled beasts like Sasquatch, Loch Ness, the alien sighting at Roswell, and the carrot mustache. But know this: Nothing is as scary, intriguing, or mysterious as AREA 52: Growswell.

Wednesday, January 25, 2012

Movin' On Up -- New USDA Plant Hardiness Zone Map

The USDA recently released a new Plant Hardiness Zone Map (http://planthardiness.ars.usda.gov/PHZMWeb/Default.aspx).

2012 USDA Plant Hardiness Zone Map.
What type of data is this mapped based upon, and how is it different from previous years? Here's what the USDA website states:

"Zones in this edition of the USDA Plant Hardiness Zone Map (PHZM) are based on 1976–2005 weather data. A trial check did not find that the addition of more recent years of data made a significant difference in the definition of these zones. Each zone represents the mean extreme minimum temperature for an area, calculated from the lowest daily minimum temperature recorded for each of the years 1976–2005. This does not represent the coldest it has ever been or ever will be in an area, but it simply is the average of lowest winter temperatures for a given location for this time period.

The previous edition of the USDA PHZM, revised and published in 1990, was drawn from weather data for 1974–1986. The longer period (30 years) of data was selected by the group of horticultural, botanical, and climatological experts who led the review of the latest revision as the best balance between smoothing out the fluctuations of year-to-year weather variation and the concept that during their lifetimes, perennial plants mostly experience what is termed "weather" rather than "climate."

Because this map was created digitally with GIS technology, it has a higher level of resolution and can show smaller areas of zone delineations than ever before. For example, cities tend to hold more heat because they have large amounts of concrete and blacktop, so a city or town may be assigned to a zone warmer than the surrounding countryside. Higher elevations tend to be colder than surrounding lower areas, so the top of a mountain may be an area of cooler zones. A location near a large body of unfrozen water may provide milder winter weather and be in a warmer zone."


So what does this mean for gardeners in Virginia, particularly the Tidewater area? Minor zone changes for some gardeners, probably not too much change for most other gardeners. Here is the detailed map of Virginia reflecting the above changes:
2012 USDA Plant Hardiness Zone Map for Virginia.
Many of the inland areas and some outlying coastal areas retained their previous zone designations. But it is interesting to note that GIS technology has allowed the USDA to define smaller zone delineations than in past versions of the map. 
.09 Acres is located in Newport News, Virginia, two blocks from the James River and near the end of the Virginia Peninsula. The southern exposure of my neighborhood on the north bank of the James River and warmth-retaining properties of the river and Chesapeake Bay are factors that influence my hardiness zone. In previous years, I was in Zone 7b. The new map has moved up my location a notch to 8a, reflecting these characteristics and suggesting we have slightly warmer winter lows than indicated on past USDA hardiness maps. In reality, my fenced/protected backyard is likely another half-zone or zone higher, reflecting an even more defined micro-climate.
It is important to note that there are always variations within these types of designations, but the USDA Plant Hardiness Zone Map can be a helpful general reference for gardeners. 
Did your hardiness zone remain the same or change from the past USDA map? Do you provide micro-climates for your plants to stretch the boundaries of your hardiness zone? Or do you say, "Phooey to all this this scientific mumbo jumbo! Mother Nature does what she wants and I have no control over her whims. This arbitrary designation doesn't mean a thing to me or my plants."
I'm looking forward to hearing your thoughts.

Thursday, January 19, 2012

Back in the Garden Again

My apologies!  It's been well over a month since my last post. The holidays and an INTENSE workload really put a dent in my gardening and blogging time. In the past 6 weeks I've done little in the yard and nothing with the blog.

Considering my neglect of the garden during this period of time, I expected Mother Nature to force me to tighten my belt a notch or two by wreaking total havoc on my tasty veggies and herbs. I imagined hard frosts, harsh winds, and cold dry air conspiring against me. I pictured languishing lettuce, crusty carrots, and beat up beets.

What did I find? Beautiful broccoli.

Calabrese broccoli head approximately 8" in diameter. This plant was grown in a glazed ceramic pot.
Don't think broccoli is beautiful? How about now?

Calabrese broccoli head.
This head of broccoli looks almost like a coral reef you'd expect to see off the Florida Keys rather than in a backyard garden in Newport News, Virginia. This plant was grown from seed in a large glazed ceramic pot. I mulched it with a thick layer of wheat straw after it germinated and haven't fussed over it since then. Yes, I hand-picked a few caterpillars but did little else. It is also growing smaller side shoots that I will only cut after I harvest the main head.

What else did I find that I didn't deserve? A cool cover crop.

Diego standing guard over a 4' x 8' bed of winter rye and hairy vetch cover crop.
I purchased Wren's Abruzzi Winter Rye and Hairy Vetch cover crop seeds last September from Southern Exposure Seed Exchange at the Heritage Harvest Festival at Monticello. I mixed and planted them in a 4' x 8' bed previously occupied by my Inchelium Red garlic. The seeds germinated easily and very quickly filled the bed. It's a vibrant addition to the otherwise muted colors of the winter landscape. I plan to cut and till the cover crop into the bed in early spring before planting tomatoes in late spring.

The cover crop is also important for another reason I did not anticipate. Dogs are natural foragers, and my two dogs often ate grass in my previous yard to aid in digestion. By successfully smothering my grass, I unintentionally eliminated one of their favorite diet supplements. Last summer, I often found my dogs sampling different weeds and other greens because they were looking for a suitable substitute for their favorite but now missing forage. As soon as the cover crop germinated and grew, Diego would regularly run over to the bed and dine on selected shoots of Winter Rye. He still does, seems to love the stuff! So in a way, it's a happy system. Soil feeds cover crop; cover crop feeds soil, dog, and future plants; plants feed human; human feeds cover crop to the soil; repeat. My only concern is that Diego doesn't get comfortable dining on whatever he choses from the raised beds. That could be a problem.

Maybe I'll construct a bone-shaped raised bed for dog edibles...then again, maybe not.

The broccoli and cover crops are just two of the many reasons why Diego and I are beginning to appreciate winter gardening more than summer gardening. There is little to do after planting and germination other than to harvest the rewards of Mother Nature. No toiling, no tilling, no sweating.

Many other veggies are doing very well despite my neglect, but I'll save them for another post. Hope all is well in your gardens.

Monday, December 12, 2011

A Jekyll and Hyde December

.09 Acres is having an identity crisis this December, and I fear that Dr. Henry Jekyll and Mr. Edward Hyde are living in my garden shed.

Dr. Jekyll and Mr. Hyde in the well-appointed garden shed at .09 Acres. Image courtesy of Wikipedia.

Let's start with Dr. Jekyll, shall we?! The vegetables at .09 Acres are much like Jekyll. They are mature and respectable. The lettuces and chard are good looking, tasty, and protected by the mini hoop house. The carrots, beets, and broccoli are doing just fine while prominently exposed to the elements. At this point in the year, they are all content in their beds until harvest. I'm not one to boast, but my greens look like they belong in a gardening catalog. If you were to walk by the lettuce bed, you might even respectfully tip your cap as if you were passing Dr. Jekyll on the street.

On the flip-side, my fruit trees, shrubs, and brambles are behaving in an irrational and unpredictable Hyde-like fashion. The inconsistent weather, much like Mr. Hyde's strange potions, is triggering all kinds of strange reactions from the plants. Raspberries continue to mature on a  semi-regular basis almost like it's early fall. The Celeste fig tree and espalier dropped all their leaves weeks ago. In contrast, my Violette de Bordeaux and Negronne fig trees are still covered in leaves and figs. It is quite grotesque to see them growing side-by-side. My Red Russian pomegranate is the only "normal" tree in the yard, having gone dormant in November. But who knows...it may be inwardly lusting for some sinister transformation.

A little bit of Jekyll, but certainly a lot more of Hyde at .09 Acres.

If .09 Acres is Dr. Jekyll (and Mr. Hyde), I guess that makes me Jekyll's loyal servant Poole. This December I've been out in the yard early in the morning and late in the evening to cover the greens in plastic. I've also changed quite a few things in the yard to keep Jekyll happy and productive. I dug up and potted my in-ground blueberry bushes and replaced them with a young Angel Red pomegranate tree (visible on right side of above picture in middle of straw mulch). I also transplanted a Peter's Honey fig and an unknown fig from my yard to my aunt and uncle's property and replaced them with Strawberry Verte and Hardy Chicago figs (visible on left side of above picture in middle of straw mulch).

Hopefully this will decrease the likelihood that Mr. Hyde shows up again at .09 Acres, but I may be losing my mind in the process...

Saturday, December 10, 2011

Raspberries in December

It's December 10th and my Kiwi Gold raspberry canes are still producing berries. I don't know what to say. I guess the warmer weather and protected location of my berry trellis has something to do with it.

Kiwi Gold raspberries in December. Definitely a rare occurrence in southeast Virginia.

I regularly get a large early summer and fall harvest, but never a third harvest. Don't get me wrong...I'm not complaining. It's just strange for me to see these things in my yard in December!

Tuesday, December 6, 2011

Same Day, Different Leaves

Check this out. Here is a picture taken last weekend of my Celeste fig. All leaves dropped, looking dormant and ready for winter.

Celeste fig. I'm trying to keep it pruned as a multi-stem shrub.
And here's a pic of my Violette de Bordeaux (VdB) fig taken on the same day. Keep in mind that this fig is planted only about 15 feet away from my Celeste fig with the same general southerly exposure.

Violette de Bordeaux fig fully leafed out in December.
This VdB fig has all of its leaves with only minor brown/dry damage from a recent frost, and it is also still loaded with figs. The difference between this tree and the Celeste is really quite amazing.

I guess variety is the spice of life, even in the world of figs!

Saturday, December 3, 2011

Frost Protection

We had our first frosts of the year in late November. Two or three of them. Fortunately all the fall/winter veggies survived, but I'm making preparations to protect the crops once the temps remain consistently cold.

Last year I constructed two experimental mini hoop houses in mid January after the frost had already taken a nasty toll on the greens. This year I expanded the idea by building one long, continuous hoop house.

PVC hoop house frame built over raised beds of lettuce, spinach, chard, and other tender greens. Plastic will be attached soon.
Currently only the PVC has been added to the raised beds. I used 10-foot sections of 1/2" PVC pipe and pushed it directly into the soil within the raised beds. I bent each pipe by hand over the bed, forming the "ribs". I then attached the "ribs" to a long "spine" with plastic zip-ties. The structure is fairly strong and will withstand wind and snow. We are expecting warmer weather for the next 5 days so I likely won't secure the plastic covering until sometime next week.

Note how the PVC is pushed into the soil against the interior sides of the raised beds. No screws, brackets, or fasteners are required. It's an easy, effective, and inexpensive setup.
I only opted to cover my more tender vegetables like lettuce, arugula, spinach, and chard.  I did not cover the kale and root crops like carrots and beets. They are, however, heavily mulched with a thick layer of wheat straw for protection. They withstood just about everything last year and I'm hoping they do the same this year.

From left to right: Buttercrunch, Winter Density, Parris Island Cos, and Rouge d'Hiver lettuce. Spinach is barely visible farther down the bed. This hoop house will function like a mini refrigerator once it is covered with plastic, protecting the vegetables and keeping them cold but not frozen.
Colorful head of Rouge d'Hiver lettuce.
Ruby Red Swiss chard. I planted these seeds on September 15, but they took a long time to germinate because of very hot temperatures in late September and early October.
Not everything in the garden looks great right now. I had a heck of a time battling  caterpillars on my broccoli and kale. Fortunately they only seemed interested in those two plantings and not the other veggies, but it didn't take long for them to completely defoliate this poor plant.

Kale that was completely devoured by caterpillars. Lots of carnage and not a lot of leftovers.
There are a handful of chemicals and products (organic ones too) to battle these beasts. I did buy a bag of powdered Bacillus thuringiensis (Bt), an organic bacteria that is effective on caterpillars, but I got lazy and never applied the stuff.

Now I just need somebody to play Taps on the trumpet while I add these remains to the compost pile and pay my respects.